
Working with Uinta Project Templates
Uinta includes templates to help you work more efficiently. You can download a sample project template and adjust it to match your specific project needs or create your own template.
This article explains how to create, edit, delete, copy, and export project templates. For additional project templates, contact Juniper Systems.
Create Templates
To create a template:
-
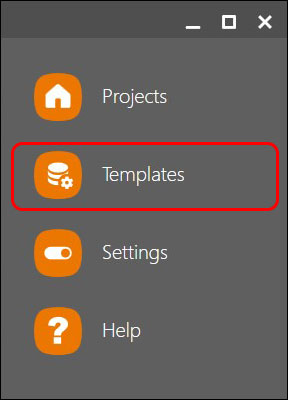
In the menu, select Templates.
-
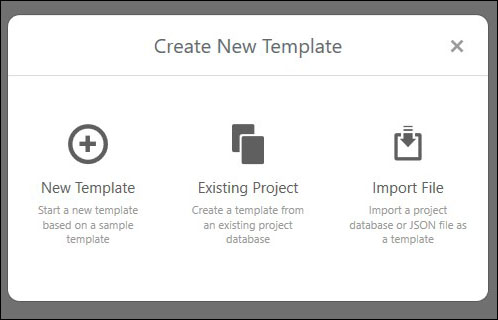
Tap the orange plus
 .
. -
Choose one of the options:
-
New Template: Base a template off a sample template.
-
Existing Project: Base a template off an existing project.
-
Import File: Import a project database (DB) or JSON file.
-
Edit Templates
To edit a template:
-
Select one of the templates or a record within a template.
-
Select the pencil icon.

-
In the edit box, make your desired changes, such as adjusting the name, symbol, color, or icon.
To edit the fields within a template, see the next section.
Edit Fields
-
In the edit box, select Edit Fields.

-
Select one of the available options:
-
The trash can icon
 at the top of the form allows you to delete the entire form.
 -
The pencil icon
at the top of the form allows you to edit the form details (name, symbol type, color, icon). -
The gear icon
 next to each record in the form displays the record settings:
 -
Edit: Make changes to the name, field instructions, required/unrequired status, abbreviation, default value, and append sequence number.
-
Rearrange: Use the down one, up one, top, or bottom row options to move the fields.
Note: In Windows, you can move the fields by dragging and dropping. -
Hide/Unhide: Hide (or unhide) a field from view on the template.
-
Make required/unrequired: Require (or don't require) a field to be completed for the form to be saved.
-
Add to/remove from label: Display or hide the field from a label.
-
Delete: Remove a field from the form.
-
-
The add field button
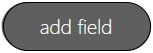 allows you to add a new field to the form. The list of fields includes short descriptions of each option.
Delete Templates
-
In the menu, select Templates to go to the templates list.
-
Select the checkbox to the left of the template name.
-
Select delete from the options at the bottom.
-
Confirm if you want to delete the template.
Copy Templates
-
In the menu, select Templates to go to the templates list.
-
Select the checkbox to the left of the template name.
-
Select copy from the options at the bottom. A copy of the template will appear in the templates list.
Export Templates
-
In the menu, select Templates to go to the templates list.
-
Select the checkbox to the left of the template name.
-
Select export from the options at the bottom. The template will export as a JSON file.
Related Information
Return to the Table of Contents.