
Connect the Geode to Windows Devices
The Geode can connect via Bluetooth to Windows devices in two ways—directly to an app or with Geode Connect. If an app can connect directly to Bluetooth GPS receivers such as the Geode, that works best.
Connect the Geode to Your App Directly
Not all apps can connect directly to the Geode. Connecting to an external receiver requires manually configuring your app. If the app you are working with (or investigating) doesn’t have a process for connecting directly to the external receiver, it most likely doesn’t have this feature. A list of recommended apps is provided under Recommended Mobile GIS Data Collection Apps.
As an example, the steps to connect directly to Uinta are as follows.
Power on the Geode.
Make sure Bluetooth is enabled on your Windows device.
Pair the Geode to your device. Identify your Geode via the serial number printed on its bottom panel. If prompted by your device, enter the pair code: 0000.
Open Uinta.
Tap on the satellite icon in the upper left corner.
In the Select GPS Location screen, under Location Source, open the drop-down list of sources and select your Geode.
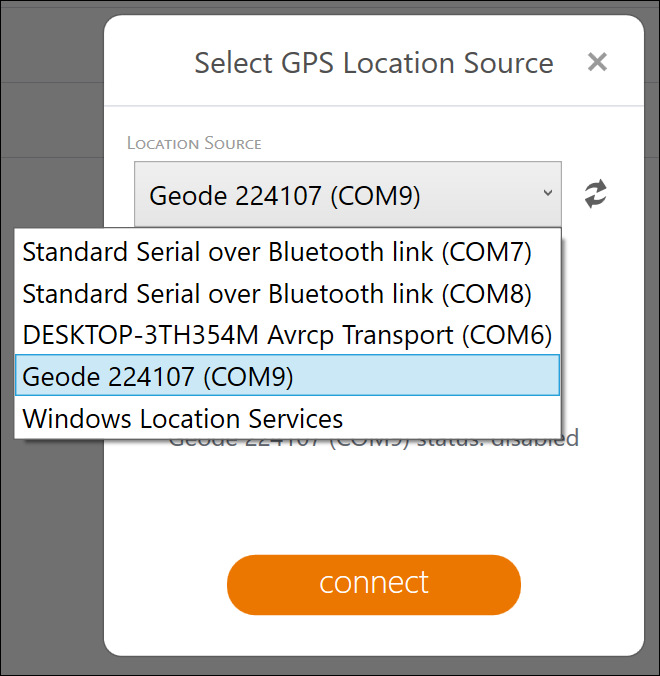
Tap Connect.
Connect the Geode through Geode Connect
Power on the Geode.
Make sure Bluetooth is enabled on your Windows device.
Open Geode Connect.
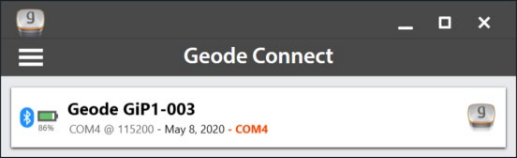
If the device has connected to a Geode previously, tap the Geode name at the top of the screen.
The app will ask you what you would like to do.
Note: If the device has not previously connected to the Geode, the app will immediately open the Device Setup screen when you open the app.
Tap Change Device. This opens the device setup screen.
The app will display a list of local wireless and connected devices. Identify your Geode via the serial number printed on its bottom panel. Tap on the name of the Geode you wish to pair with.

Note: If your Geode doesn't show up in the list of devices, check to make sure it is turned on and not paired with another device. Then tap the refresh icon at the bottom of the list of devices.
Follow the prompts to finish pairing the Geode with your device.
If prompted by your device, enter the pair code: 0000.
The Geode should now be connected to your Windows device.
Locate Assigned COM Port Number
If needed by your app, use Device Manager or More Bluetooth Options to verify the correct COM port number that is now assigned to the Geode. As a reminder, when Geode Connect is installed, it creates three generic virtual COM ports. See Geode Connect Virtual COM Ports for more details.
Verify Port in Device Manager
Go to Start > Device Manager > Ports (COM & LPT).
Select the drop-down arrow to view the COM ports. Ensure you use the outgoing COM port.
Verify Port in More Bluetooth Options
Go to Start > Settings > Devices > Bluetooth & other devices.
Under Related Settings, select More Bluetooth options.
Select the COM Ports tab and verify the assigned outgoing COM port. Ensure you use the outgoing COM port.
By default, the Geode connects at a 115200 baud rate.
Related Information
For information about how to connect the Geode via USB or Serial Port, see:
Geode Owner's Manual: Connect via USB on page 79
GNS3 User's Manual: Connect via USB on page 111
It is possible to use the Virtual COM port option in Geode Connect to connect the Geode to a third-party app. For instructions on how to set this up, see:
Geode Owner's Manual: Configure Virtual Port Settings on page 103
GNS3 User's Manual: Configure Virtual Port Settings on page 150
While some third-party apps can connect directly with the Geode through a virtual COM port, other apps depend on the Windows operating system to provide positioning data. If your app is depending on the operating system, it may be collecting data via the consumer-grade receiver in your PC or tablet—not the Geode. Windows Location Reporting allows the Windows OS to use the Geode for its Location Services instead. To enable Windows Location Reporting, see:
Geode Owner's Manual: Third-Party Apps and Windows Location Reporting on page 105
GNS3 User's Manual: OS Location on page 147