Connect and Manage GPS
Uinta connects to a device's internal GPS receiver, an external GPS receiver, or Location Services to capture location data. You can adjust the location settings and apply correction services to increase the data's accuracy.
For a list of external GPS receivers supported by Uinta, email Juniper Systems at uintasoftware@junipersys.com.
Connect GPS in Uinta for Windows
The following sections describe how to connect to an internal or external GPS receiver with a Windows device.
Connect to the Internal GPS
To connect the device's internal GPS receiver,
- Tap the GPS icon
 in the upper-left corner of the title bar.
Or, from the menu, select Settings > GPS Connection.
- Select the internal GPS.
![]() CAUTION: While Windows Location Services is listed as an option, we do not recommend using it as a valid GPS data collection source. Windows Location Services shows the position of the Wi-Fi access point (not the current position of the user).
CAUTION: While Windows Location Services is listed as an option, we do not recommend using it as a valid GPS data collection source. Windows Location Services shows the position of the Wi-Fi access point (not the current position of the user).
- Tap Connect.
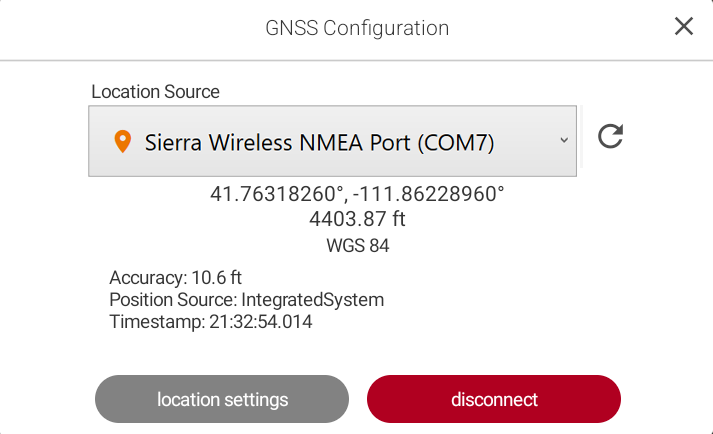
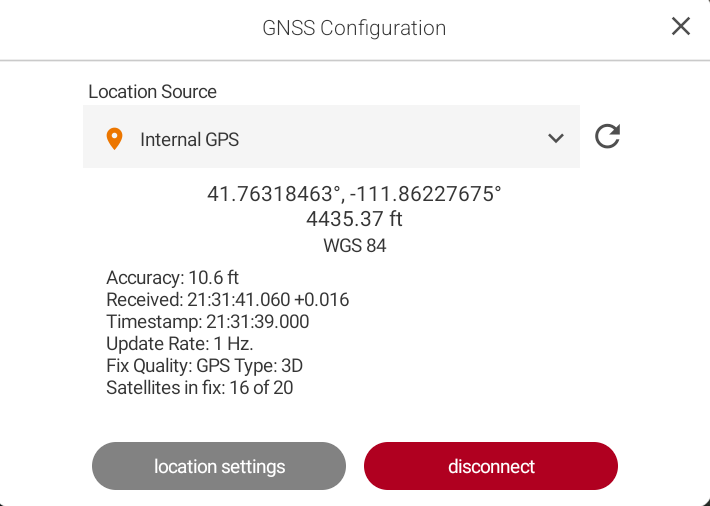
Uinta displays information about the receiver, including the accuracy, location, and position source.
- Tap
 to close the box.
Connect to an External GPS Receiver
You can connect to an external GPS receiver through Bluetooth®, USB, or serial port.
Pair to Bluetooth Receiver
To pair to an external GPS receiver,
- Power on the external GPS receiver.
- Enable Bluetooth on your Windows device.
- Pair the external GPS receiver to your Windows device.
- Open Uinta.
- Tap the GPS icon in the upper-left corner of the title bar.
Or, from the menu, select Settings > GPS Connection.
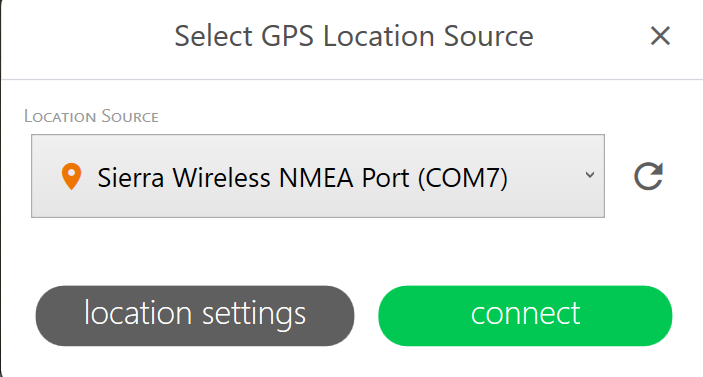
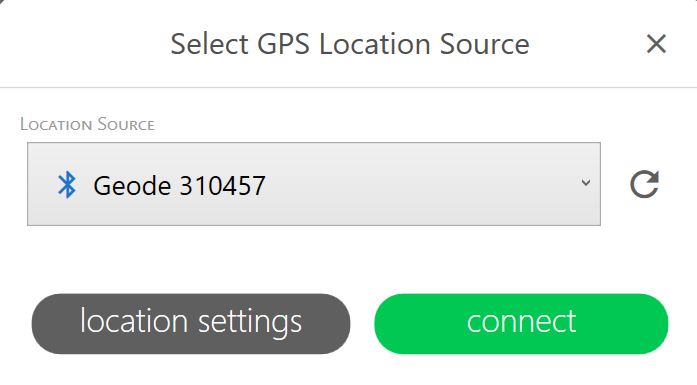
- In Location Source, select the external GPS receiver. If the receiver isn't listed, tap Refresh
 . The list may take up to 15 seconds to update.
 - Tap Connect.
Uinta displays information about the receiver, including the accuracy, correction source, fix quality, and battery charge level.

- Tap to close the box.
Connect via USB
You can connect an external GPS receiver to a Windows device using a USB cable.
- If the PC or tablet is running Windows 10, turn off tablet mode.
- Power on the external GPS receiver.
- Plug the USB cable into your Windows device and the external GPS receiver.
- Open Uinta.
- Tap the GPS icon in the upper-left corner of the title bar.
Or, from the menu, select Settings > GPS Connection.
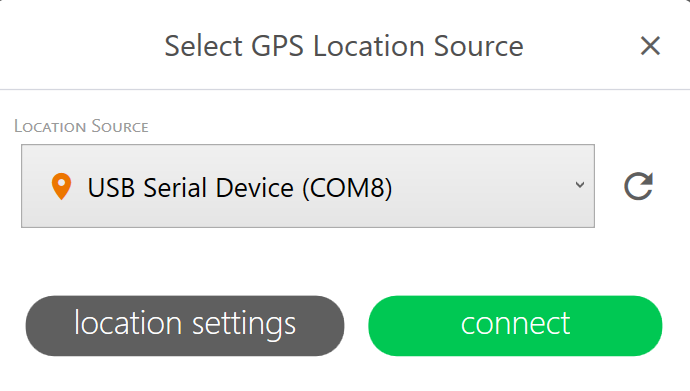
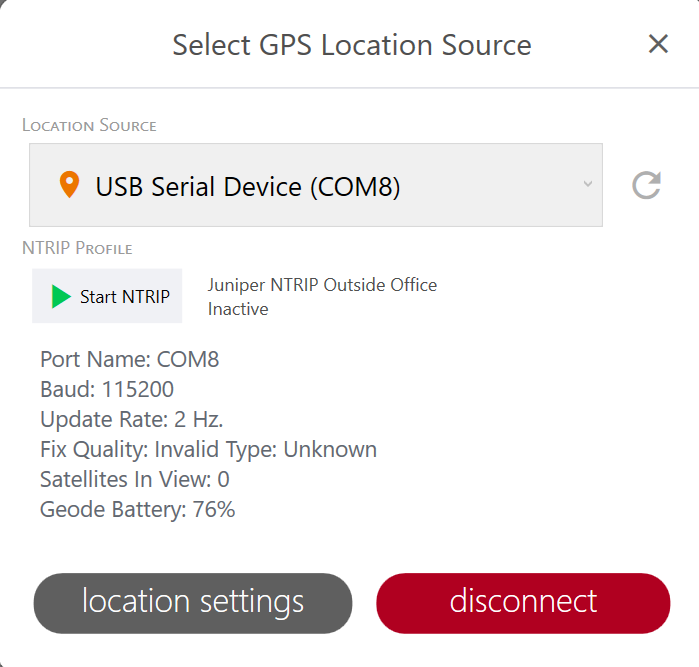
- In Location Source, select the USB serial device. If the receiver isn't listed, tap Refresh . The list may take up to 15 seconds to update.
- Tap Connect.
Uinta displays information about the receiver, including the accuracy, correction source, fix quality, and battery charge level.
- Tap to close the box.
Connect via Serial Port
Some external GPS receivers, such as the Geode, have a 9-pin RS-232C serial port. This allows the GPS receiver to be mounted to a piece of equipment while maintaining a constant connection for data and power.
To connect a Windows device and an external GPS receiver with a straight-through serial cable,
- Power on the external GPS receiver.
- Plug the serial cable into your Windows device and the external GPS receiver.
- Open Uinta.
- Tap the GPS icon in the upper-left corner of the title bar.
Or, from the menu, select Settings > GPS Connection.
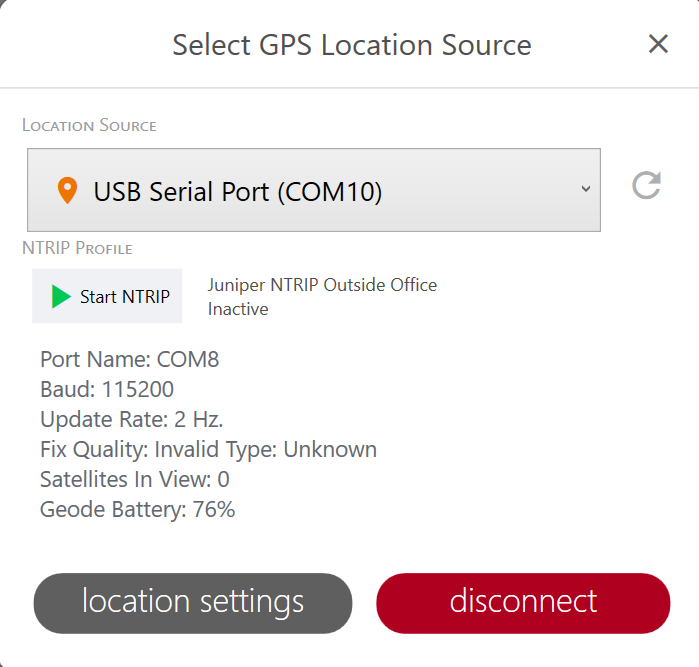
- Select the USB serial port. If the receiver isn't listed, tap Refresh . The list may take up to 15 seconds to update.
- Tap Connect.
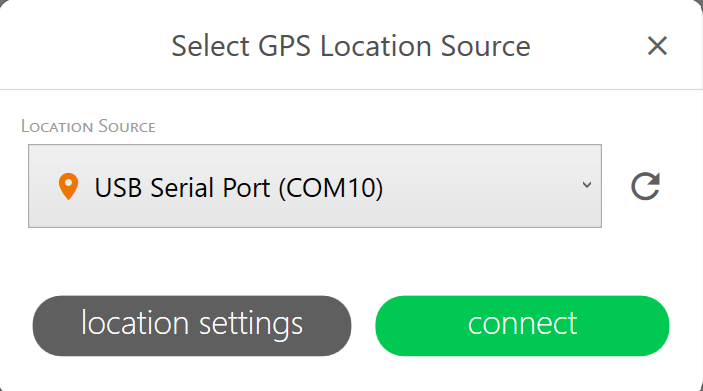
Uinta displays information about the receiver, including the accuracy, correction source, fix quality, and battery charge level.
- Tap to close the box.
Connect GPS in Uinta for Android
The following sections describe how to connect to an internal or external GPS receiver with an Android device.
Connect to Internal GPS or Location Services
Note: Android Location Services uses a combination of GPS, Wi-Fi, Bluetooth, and other sources to pinpoint a location, making it a valid data collection source.
To connect to an internal receiver or Location Services,
- Open Uinta.
- From the menu, select Connect & Manage GPS.
- Select the internal receiver or Location Services.
- If you are using Uinta on an Archer 4 with the RTK-enabled GNSS and the receiver isn't listed, tap Refresh . The list may take up to 15 seconds to update.
Note: For more information on the RTK-enabled GNSS expansion, see Archer Connect User Manual.
- If you are using Uinta on an Archer 4 with the RTK-enabled GNSS and the receiver isn't listed, tap Refresh
- Tap Connect.
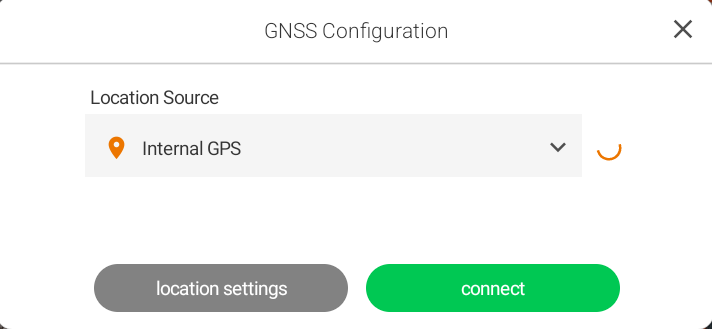
Uinta displays information about the receiver, including the accuracy, location, and fix quality.
- Tap to close the box.
Pair to an External GPS Receiver
To pair your Android device to an external GPS receiver,
- Power on the external GPS receiver.
- Enable Bluetooth on your Android device.
For devices running Android 12 or earlier, enable Location.
- Open Uinta.
- From the menu, select Connect & Manage GPS.
- In Location Source, select the external GPS receiver. If the receiver isn't listed, tap Refresh . The list may take up to 15 seconds to update.
Note: If the GPS receiver does not appear in the list of devices, ensure it is turned on and not paired with another device.
- Tap Connect.
- Follow the prompts to finish pairing the Geode with your device.
Uinta displays information about the receiver, including the accuracy, correction source, fix quality, and battery charge level.
- Tap to close the box.
Connect GPS in Uinta for iOS
The following sections describe how to connect to an internal or external receiver with an iOS device.
Connect to Internal GPS or Location Services
Note: Apple Location Services uses a combination of GPS, Wi-Fi, Bluetooth, and other sources to pinpoint a location, making it a valid data collection source.
To connect to the internal GPS receiver or Location Services,
- From the menu, select Connect & Manage GPS.
- In Location Source, select the internal GPS or Location Services.
- Tap Connect.
Uinta displays information about the receiver, including the accuracy, satellites in fix, and fix quality.
- Tap to close the box.
Connect to an External GPS Receiver
You can pair an iOS device to an external GPS receiver, such as Geode.
- Power on the external GPS receiver.
- Enable Bluetooth on the iOS device.
- Open Uinta.
- From the menu, select Connect & Manage GPS.
- In Location Source, select the external GPS receiver from the drop-down list.
- If the receiver doesn't appear in the list, tap Discover devices. Select the GPS receiver from the list and finish the pairing process.
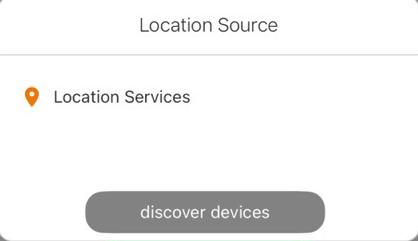
- If the receiver doesn't appear in the list, tap Discover devices. Select the GPS receiver from the list and finish the pairing process.
- Tap Connect.
Uinta displays information about the receiver, including the accuracy, correction source, fix quality, and battery charge level.
- Tap to close the box.
Adjust Location Settings
Adjust the location settings to improve the accuracy of the GPS receiver.
- Open Location settings.
- Windows―From the menu, select Settings > Location Settings.
- Android or iOS―From the menu, select Connect & Manage GPS > Location Settings.
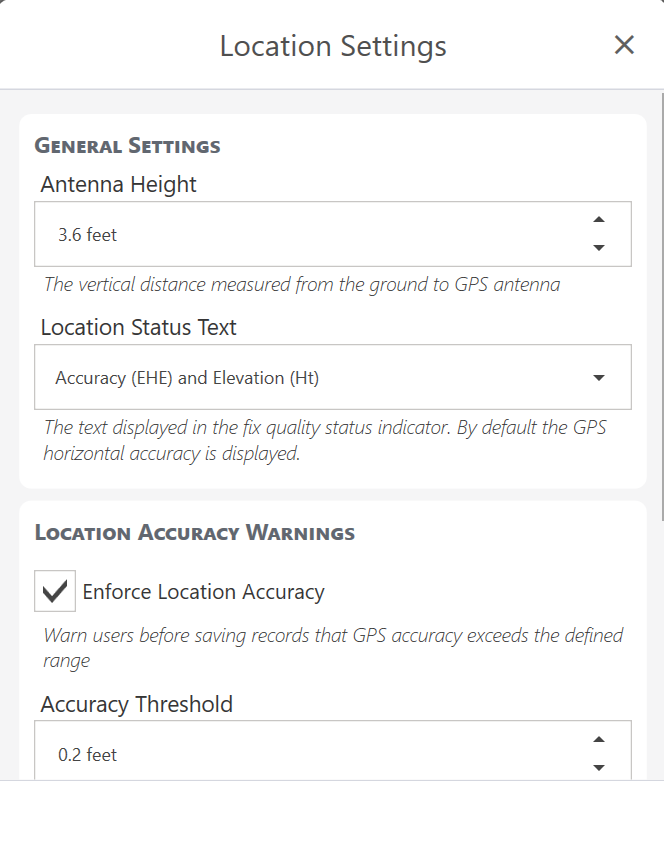
- Modify the location settings, as described in the table below.
| Location-Related Settings | ||
| Parameter | Default Value | Description |
|
Antenna Height |
0 feet |
Enter the height of your receiver mounted above the ground for greater accuracy. |
|
Location Status Text |
Accuracy (Estimated Horizontal Error) |
Options are
|
|
Location Accuracy Warnings |
Disabled |
Enable Enforce location accuracy to have Uinta warn you if the GPS accuracy exceeds the defined accuracy threshold. After the warning appears, you can choose whether to save the location that exceeds the accuracy threshold. |
|
Geoid Settings
|
varies |
Select the Geoid from the list or tap
Note: This setting is not available when using Location Services on iOS and Windows devices.
|
| Coordinate Systems | ||
|
Displayed Coordinate System* |
World Geodetic System 1984 (WGS84) Latitude/Longitude (4326) |
Spatial reference identifier based on European Petroleum Survey Group (EPSG) codes. Options are
For instructions, see Select a Coordinate Reference System. |
| Coordinate Display Format | Decimal degrees (DD.DDD) | When the displayed coordinate system includes a variety of display options, this field appears. If there are no options available in the chosen coordinate system, this field is hidden. |
| Geode Receiver Settings Available only if connected to Geode GNSS receiver. |
||
| Update Rate | 1 Hz | Sets the message output rate through the active connection port |
|
Correction Source |
Auto |
The available correction sources are determined by your Geode model.
|
|
SBAS |
Auto |
Sets the SBAS satellite signal to use for an SBAS-corrected solution. Options are
|
| NTRIP Settings Available only if connected to Geode GNSS receiver. |
||
|
NTRIP Profile |
Select, add, or edit the NTRIP Profile you use. Use the drop-down arrow to select previously created profiles. Use the plus sign to create a new profile. Use the pencil to edit the profile. When creating a new profile, enter
For specific instructions on using NTRIP with Geode, see Use NTRIP with Geode and Using Uinta and Geode for RTK Correction in our knowledge base. |
|
|
NTRIP Connection |
Tap Start NTRIP to begin an NTRIP connection. |
|
|
NTRIP Diagnostic Log |
Information about the NTRIP connection. |
|
* The display projection is WGS84 Pseudo-Mercator/Web Mercator (EPSG 3857) which creates a smooth rendering of maps and map tiles. For display purposes, when fully zoomed out the map projection repeats to create a continuous scrolling map.
Manage Installed Geoids
To change the Geoid, Uinta must be connected to a location source, such as an external GPS receiver, Android Location Services or the Android internal GPS.
Note: This setting is not available when using Location Services on iOS and Windows devices.
To install and manage installed Geoids,
- Under Geoid Settings, tap
 . Uinta opens the Manage Installed Geoids screen.
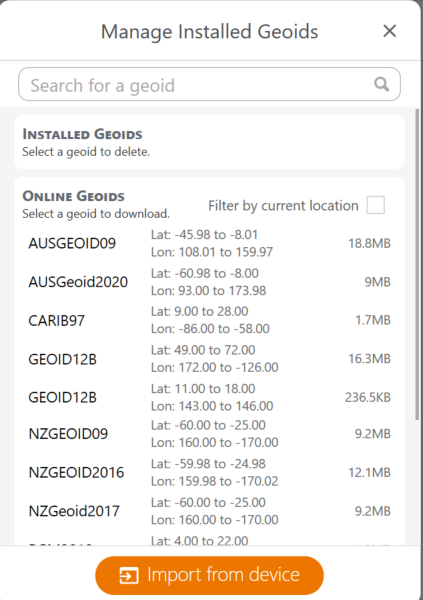
- To narrow the list of available Geoids, filter by current location or search for a specific Geoid.
- To install a Geoid,
- To use a Geoid saved on your device, tap Import from device.
- To use a Geoid from the list of online Geoids, select the Geoid and tap Download. Then, tap Download again to confirm.
- To delete a Geoid, select it from the list of downloaded or installed Geoids. Then, tap Delete.
- Close Manage Installed Geoids.
- In Geoid Model, tap and select the Geoid from the list.
- Close Location Settings.
Additional information on spatial reference systems can be found in our knowledge base.
Select a Coordinate Reference System
WGS84 is the most common coordinate reference system. However, there are thousands of coordinate reference systems, and another coordinate reference system may fit your situation better.
To select a coordinate reference system other than WGS84,
- Open Location Settings.
- Windows―From the menu, select Settings > Location Settings.
- Android or iOS―From the menu, select Connect & Manage GPS > Location Settings.
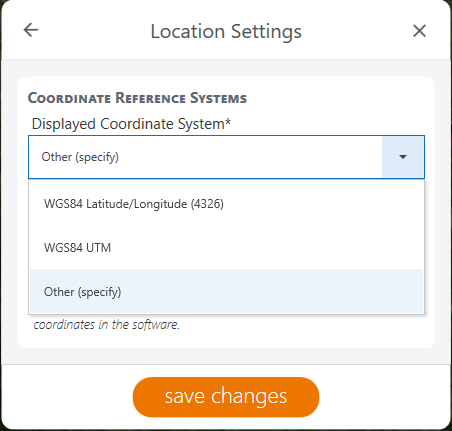
- Tap Coordinate systems.
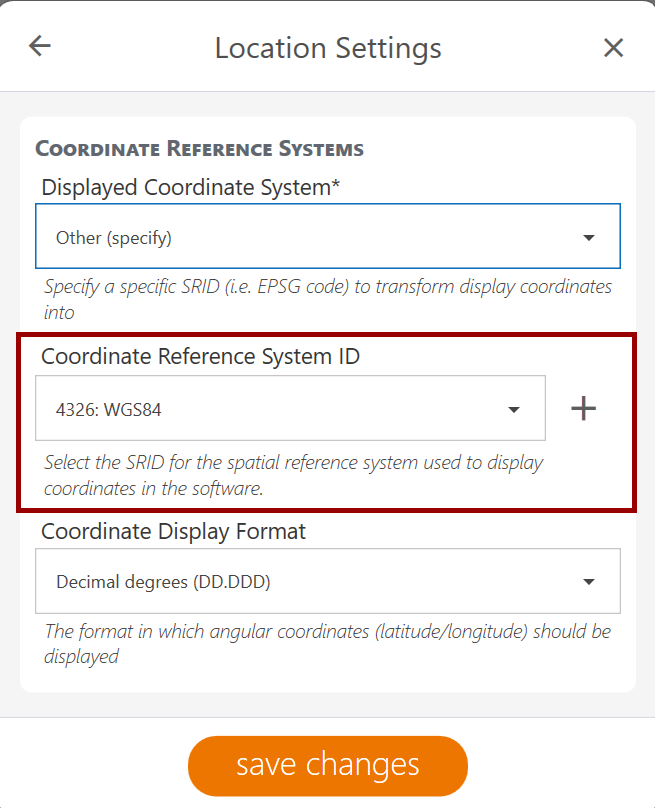
- In Displayed coordinate system, select Other.
- Tap
 next to Coordinate Reference System ID.
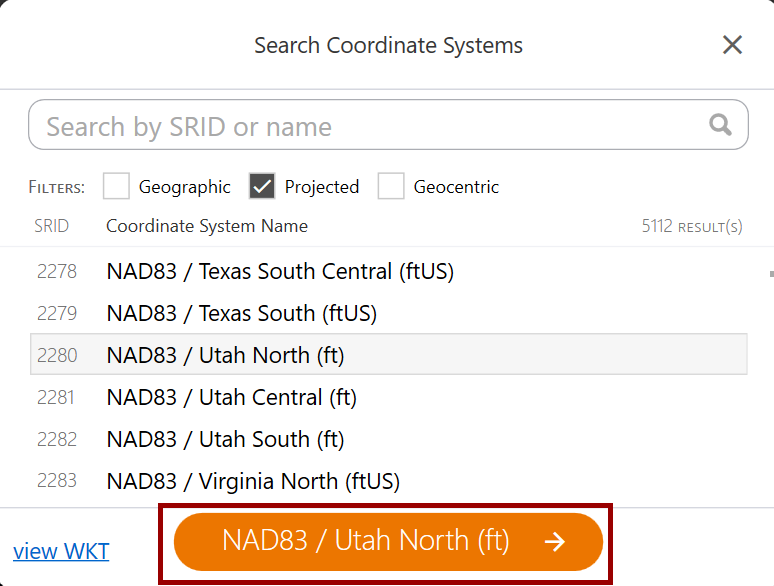
- Select the coordinate reference system that you want to use.
- Narrow the list by applying a filter or searching by Spatial Reference Identifier (SRID) or name.
- Tap the next button to apply the coordinate reference system.
- Tap Save changes.
- Tap
 to return to location settings.
Monitor the GPS Receiver Accuracy
The GPS icon, located in the title bar in Windows or at the bottom of the screen in Android or iOS, shows the fix quality and the accuracy of the receiver.
Tap the GPS icon to view additional details about the GPS receiver, including the accuracy, correction source, fix quality, and battery charge level.
Understanding the GPS Icon Colors
The color of the GPS icon is based on the fix quality.
| GPS Icon Colors | ||
| Fix Quality | Additional Criteria | |
|
No GPS connection |
||
| Standard GPS fix | Fix is two dimensional | |
| Fix is three dimensional | ||
| Differential GPS (DGPS) | ||
| Precise Positioning System (PPS) | ||
| RTK and RTK Float | ||
| Wide Area Augmentation System (WAAS) | ||
|
Dead reckoning, manual, or simulation |
Color is based on GPS accuracy. (See table below.) If no accuracy can be determined, this color is used.
|
|
|
Invalid or unavailable
|
Color is based on GPS accuracy. (See table below.) If no accuracy can be determined, this color is used.
|
|
| GPS Accuracy | |
| Estimated Horizontal Error (EHE) | |
|
EHE is less than 1 meter |
|
|
EHE is less than 3 meters |
|
|
EHE is less than 5 meters |
|
| EHE is 5 meters or greater |
Disconnect the GPS Receiver
To disconnect the GPS receiver,
- Tap the GPS icon, located in the title bar in Windows or at the bottom of the screen in Android or iOS.
- Tap Disconnect.
Use Uinta to Auto-Configure Geode
If you are using Uinta and connect to a Geode GNSS receiver, you may be prompted to auto configure the Geode.
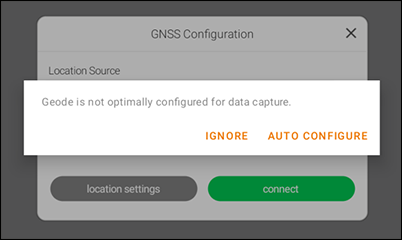
Auto Configure applies the following recommended settings for using the Geode with Uinta.
| Settings | |||
| Configure Geode Category | Auto Configure Settings for GNS3 |
Auto Configure Settings for GNS2 |
Notes |
| Active GNSS Constellations |
GPS Multi-GNSS |
GPS Multi-GNSS |
|
| NMEA |
RD1 GGA GNS GSA GST GSV RMC |
RD1 GGA GNS GSA GST GSV RMC |
|
| Update Rate | 1 Hz | 1 Hz | |
| Advanced Section | |||
| NMEA Precision | 8 | 8 | |
| Mask Angle | 10 | 10 | |
| Correction Source | Auto | N/A | For more information, see Geode is not Seeing Satellites. |
| SBAS | Auto | Auto | |
| Receiver Mode |
Mixed Null NMEA |
Mixed Null NMEA |
Turn off Mixed to get the greatest accuracy. See Default and Recommended Settings for GEODE for more information. |
|
Battery Status Sentence |
10 seconds | 10 seconds | |