Import Data
You can import data created in Uinta or other applications, and then choose whether to use the data in a new or existing Uinta project. Uinta accepts KML, SHP (zipped), CSV, and GPKG file formats.
Import Database or File as New Project
You can import a Uinta database (.db) or data saved in a SHP, KML, CSV, or GPKG file and save it as a new project in Uinta.
To import a file as a new project in Uinta,
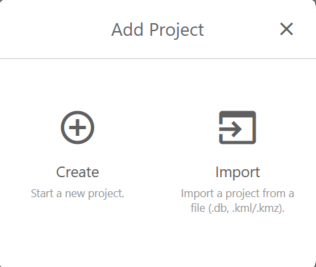
- Open the Projects screen.
- Tap
 .
.
- Tap Import.
- Locate the file you want to import, and tap Open.
- In the Project Setup dialog box, enter information about the project.
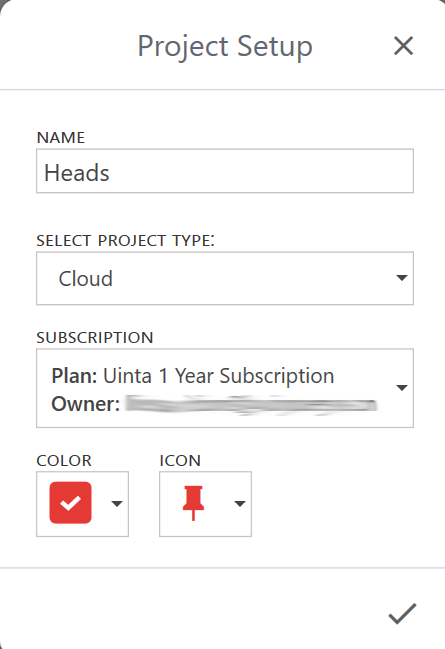
Project Setup Field Enter Name Enter the name of the project.
Select Project Type Select Cloud or Local.
For an explanation of project types, see Plan, Create, and Manage a Project.
Color Select the identifying color from the drop-down list.
Icon Select the project icon from the drop-down list.
- Tap
 .
. - If you selected cloud as the project type, set up the project access and tap .
Uinta notifies you that you have successfully updated the project sharing access.
- Tap OK.
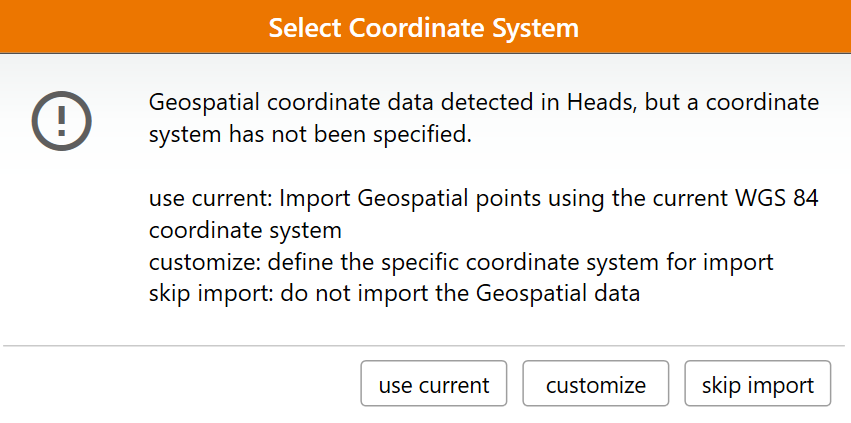
- If Uinta detects geospatial data in the imported file, determine how to import the data.
- Tap Use current to use the geospatial coordinate system used in the CSV file, such as WGS84.
- Tap Customize to select the desired coordinate system for the geospatial data.
- Tap Skip import to import only non-geospatial data.
Uinta opens the new project in Map View.
Import Data into an Existing Project
You can import data into Uinta and add it to an existing Uinta project. You have the option to add the data as new record types or to map it to existing record types already defined in a project template. During the import process, you select whether to import all of the data or just the selected data.
Import and Create New Record Types
To import a file into an existing Uinta project and create new record types,
- Open the Uinta project into which you want to import the data.
- Tap .
- In the Select Record Type dialog box, tap Import.
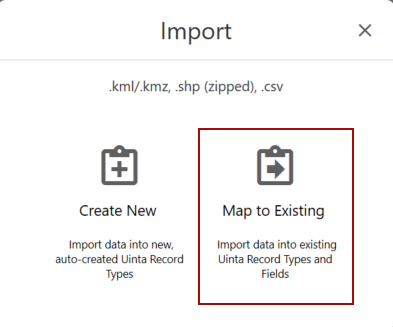
- Tap Create New.

- Select one of the following options:
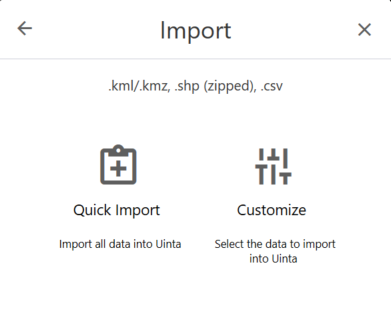
- Quick Import—Import all of the data into Uinta. Recommended for data imports where it is okay to create new record types in a project template.
- Customize—Select the specific data you want to import into Uinta. Recommended for data imports where imported data is intended to be a part of an existing record type.
- Locate the file you want to import, and tap Open.
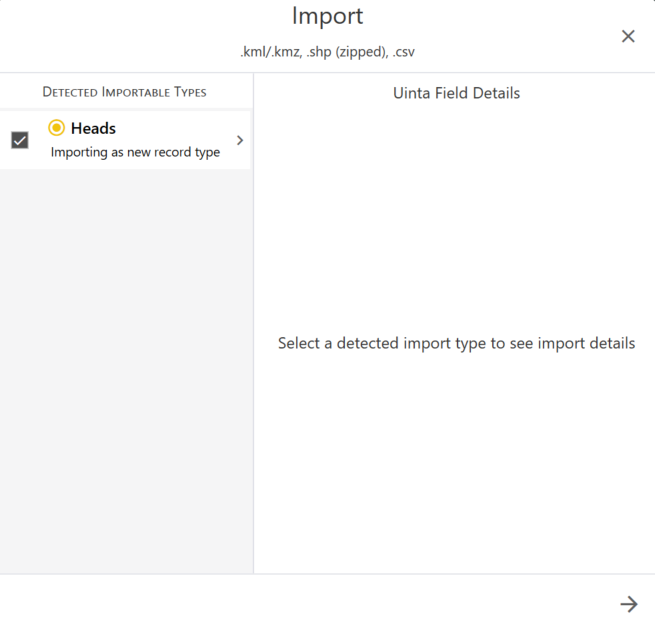
If you selected Customize, Uinta opens the Import window. The record type(s) in the imported file appear in the left column. Tap a record type to view the fields and see how they will be added in Uinta. Select the checkbox next to each record type that you want to import and tap ![]() .
.
- If Uinta detects geospatial data in the imported file, select the import method.
- Tap Use current to use the geospatial coordinate system used in the file, such as WGS84.
- Tap Customize to select the desired coordinate system for the geospatial data.
- Tap Skip import to import only non-geospatial data.
Uinta imports the data into the project.
Map to Existing Record Types
To import a file into an existing project and map the fields to fields in an existing record type,
- Open the Uinta project into which you want to import data.
- Tap .
- Tap Import.
- Tap Map to Existing.
- Locate the file you want to import and tap Open.
The left panel displays the imported file. The right panel displays the fields into which you are importing the data and the source coordinate system.
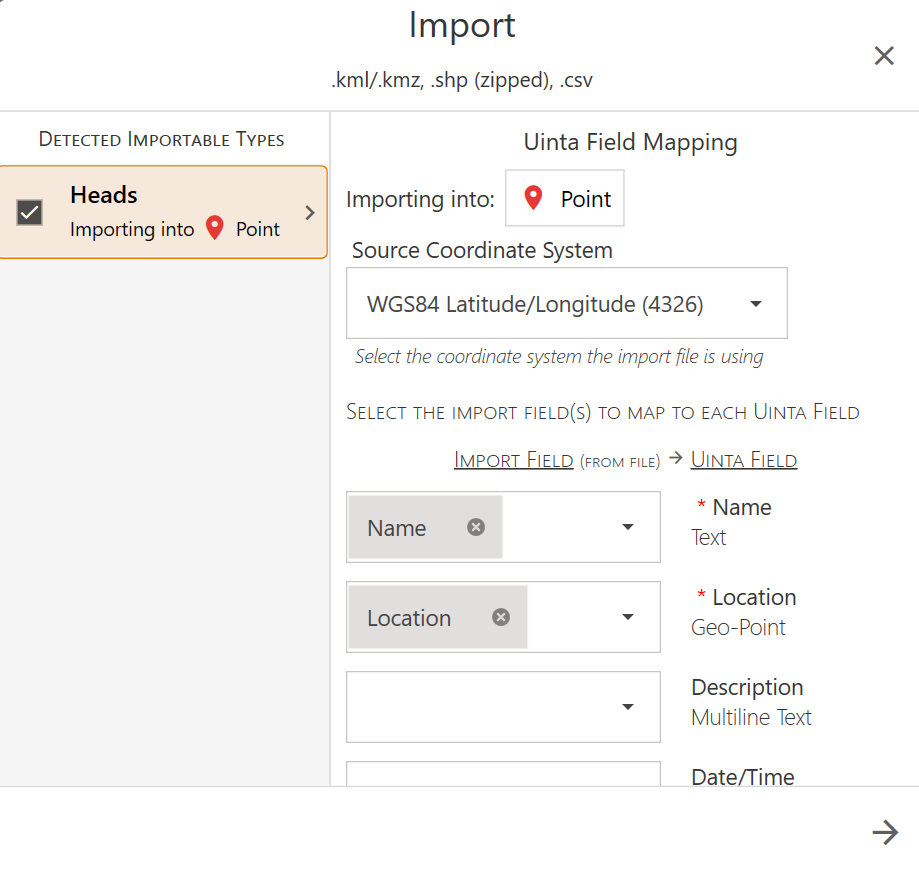
- For each field, ensure the desired field in the importing data is matched to the existing field in the Uinta project.
- Uinta automatically recognizes fields with the same name.
- Use the drop-down list and select the field that aligns with the existing project field.
- After you identified all of the fields, tap
 .
.
Uinta imports the data fields into the project and opens the project in Map View.