Learn Geode Connect for Windows
Geode Connect is a utility app that allows you to customize and fine-tune the Geode to your specific project or application. Each screen in Geode Connect serves one of three primary functions: configuration of the Geode, validation of Geode accuracy, or changing Geode Connect settings. Though it does have some limited data-capture features, these are included only for demonstration purposes. Geode Connect is not intended to replace your data-collection app.
Home

The Home screen for Geode Connect serves as a dashboard for the Geode receiver. On this screen, you can view connection status, correction mode, and positioning data. It displays latitude, longitude, altitude, estimated horizontal error, fix info (GPS, DGPS, RTK, and so on), speed, heading, number of satellites in fix, PDOP, and correction signal.
You can drag and drop each box to reorganize the screen to your preference.
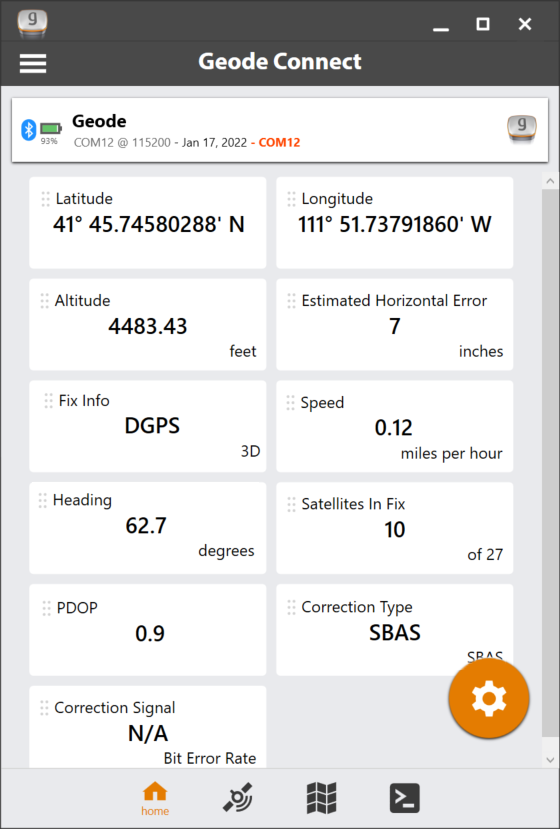
From the toolbar on the bottom of the screen, you can access the Skyplot, Map, and Terminal screens. Tap the receiver name at the top to change receivers. Open the menu to view preferences and open additional screens. The Settings menu provides options for the configuration of the Geode receiver and Geode Connect settings. For more information on these options, see Settings.
Skyplot

The Skyplot screen shows which satellites are being used in the positioning solution and where they are in the sky. It also shows satellites that are being tracked by the Geode.
On the Skyplot screen, each satellite is identified by a space vehicle number (SVN) and color for its constellation. The location of each satellite on the
Skyplot indicates where its location in the sky relative to true north. The outside ring is 0° elevation (horizon). The inside ring is 45° elevation—halfway above the horizon from the Geode’s present location. The intersection of the two lines indicates directly overhead.
On the Skyplot screen, each satellite is identified by a space vehicle number (SVN) and color for its constellation. The location of each satellite on the skyplot indicates where it resides in the sky overhead relative to true north. The outside ring is 0° elevation (horizon). The inside ring is 45° elevation—halfway above the horizon from the Geode’s present location. The intersection of the two lines indicates directly overhead.
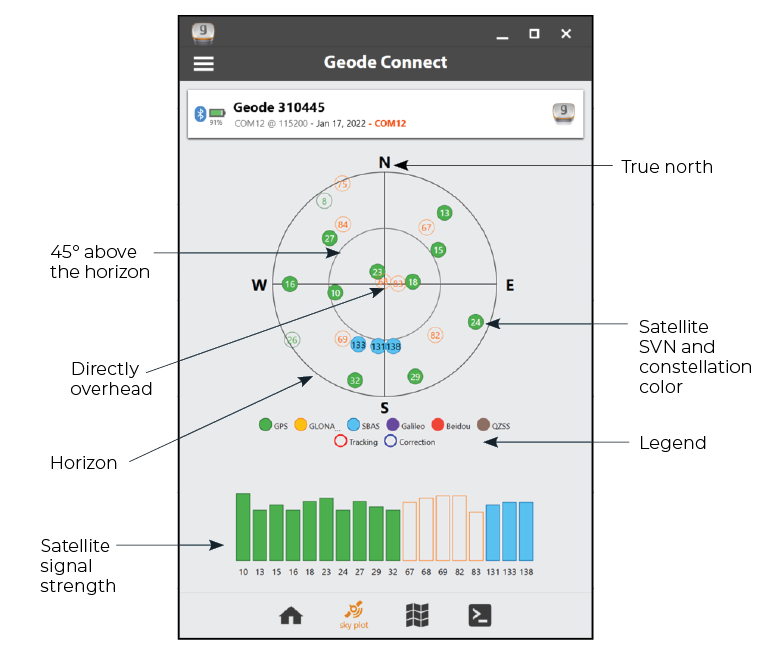
Satellite symbols outlined in red indicate that the satellites are being tracked, but they are not yet a part of the positioning solution. Satellite symbols outlined in blue indicate that a correction is being applied to the signal.
Multi-GNSS Geode models support the Galileo, BeiDou, GPS, QZSS, SBAS, and GLONASS constellations.
The Skyplot screen is meant to be used as a guide. It shows the relative visibility of satellites in the sky, but it is not an absolute reference for satellites used in the positioning solution.
If the Skyplot screen is not displaying data,
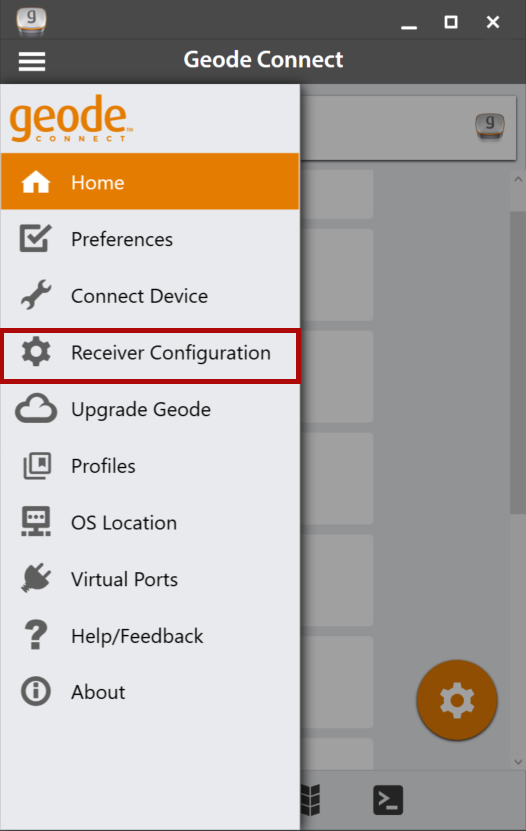
- Go to the Configure Geode page by tapping the menu icon
 in the navigation bar.
 - Tap Receiver Configuration.
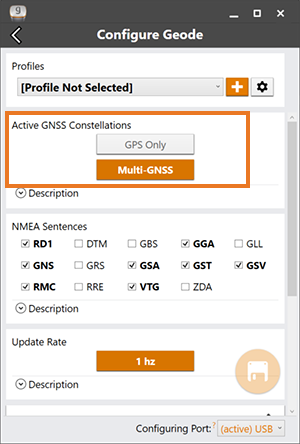
- Under Active GNSS Constellations, select Multi-GNSS.
- Under NMEA Sentences, select GSV.
- Tap the save icon
 .
.
Map

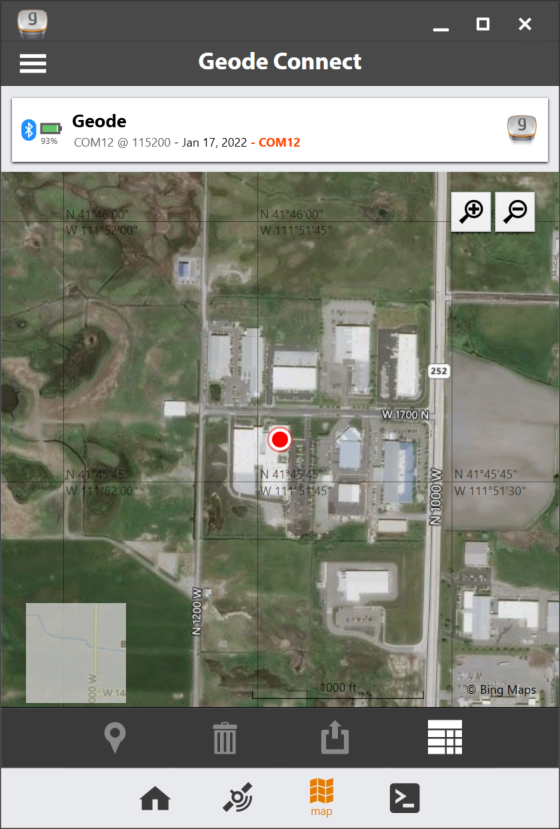
The Map screen allows you to see their position in relation to public roads and other landmarks.
On the Map screen, you can capture, compare, and navigate to waypoints.
Capture, View, and Compare Waypoints
To capture waypoints, place the Geode in the position you would like to capture, and tap the waypoint icon ![]() . View waypoint information by selecting a specific waypoint on the map.
. View waypoint information by selecting a specific waypoint on the map.
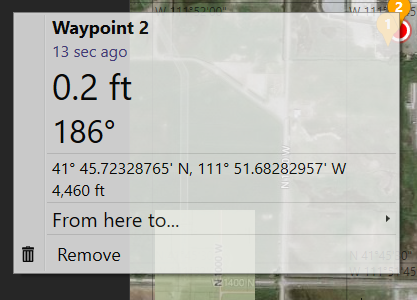
Geode Connect will show you the waypoint’s distance and bearing compared to your current position. It will also display the latitude, longitude, and altitude of the waypoint.
To delete the waypoint, tap Remove.
To compare the waypoint to another waypoint,
- Tap From here to. . .
- Select the waypoint to which you want to compare your current position.
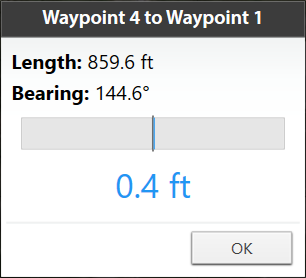
The blue shaded area represents the cross track error between where you are now and what you need to do to get back on the direct path between the two waypoints.
Terminal

The Terminal screen displays the NMEA sentences the Geode is receiving. You can include timestamps (top left), pause (middle), capture the information (top right), or view the captured data files (top right).
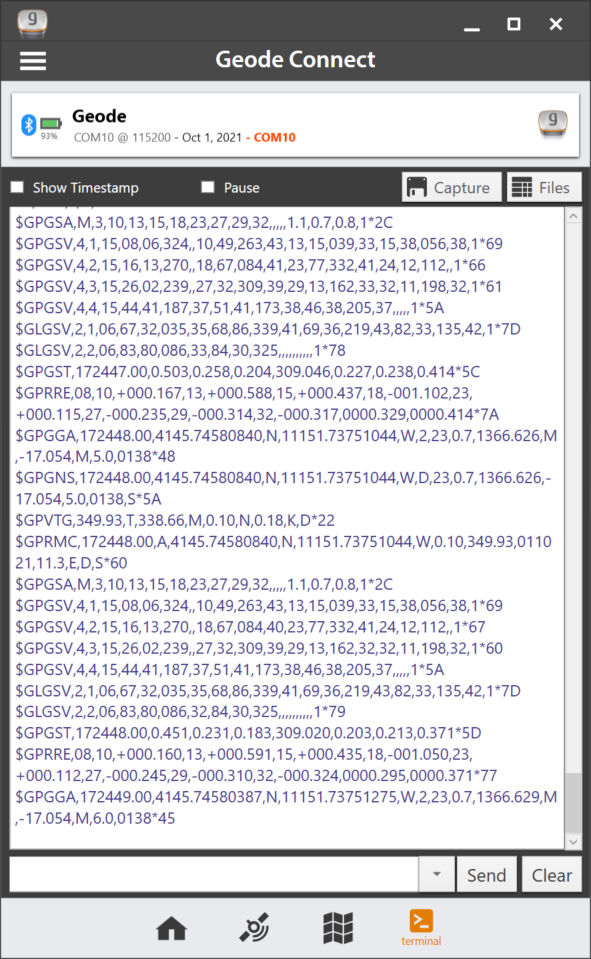
At the bottom of the Terminal screen, there is a command line. This gives you flexibility to configure the Geode and customize the data output.
Tap the down arrow next to the command line to reveal the Show Log and Hide Log commands.
For a comprehensive list of commands and messages that can be used to configure the Geode, refer to the technical documentation provided by Hemisphere GNSS.
- Go to https://hemispheregnss.com/ > Resources & Support > Technical Documentation.
- Select Technical Reference Manual (it may include a version number).
![]() CAUTION: Use at your own risk. It is possible to cause communication or other errors in the Geode that may require technical assistance to repair.
CAUTION: Use at your own risk. It is possible to cause communication or other errors in the Geode that may require technical assistance to repair.
Capture, Save, or Share NMEA Sentences
To record the NMEA sentences, tap Capture. Geode Connect will begin to record your data.
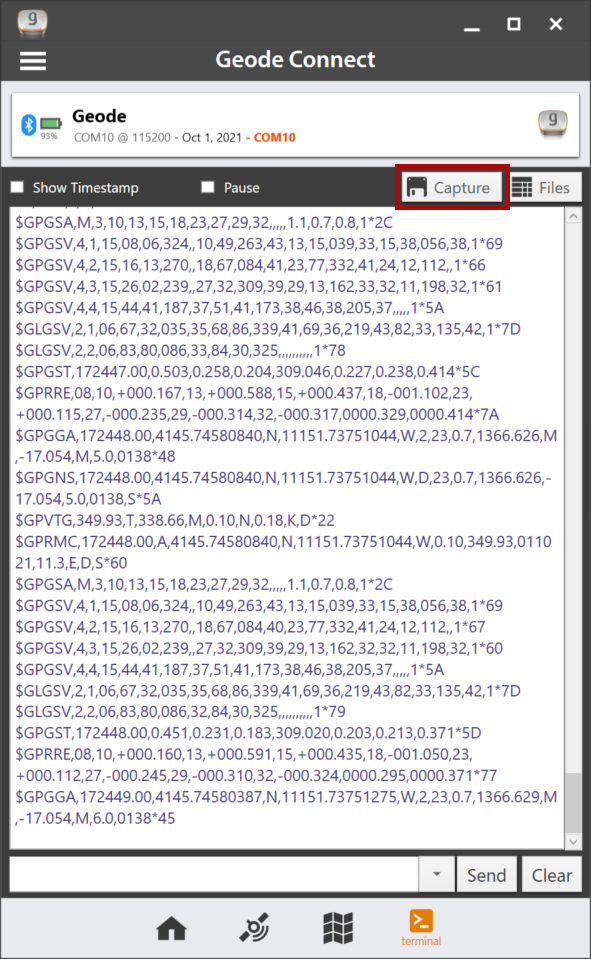
To stop recording, tap the timer that replaced the Capture button. The string of NMEA sentences will be saved.
Tap Files to view the saved recordings. From this screen you can organize, share, or delete the NMEA recordings.
Settings

The Settings screen provides options for the configuration of the Geode receiver and Geode Connect settings. The following sections describe each of these options.
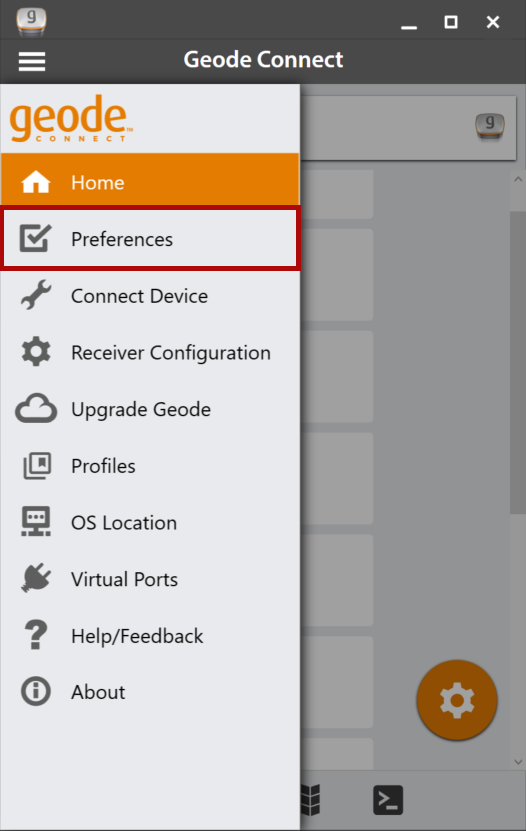
Preferences
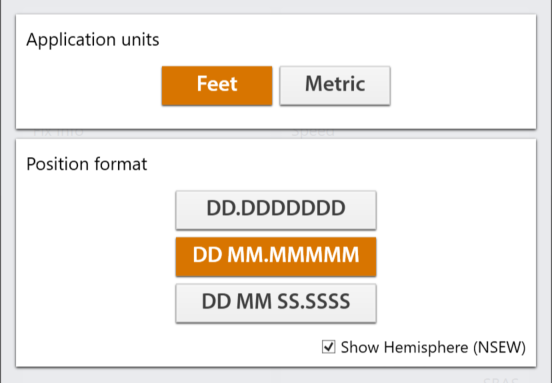
The Preferences screen allows you to customize your preferences for how information is displayed in Geode Connect.
You can specify application units (feet or metric), position format, and whether or not the app will show the hemisphere.
Note: Changes must be saved in order for them to remain from screen to screen. If the save icon in the lower right corner of the screen is orange, this means there has been a change that needs to be saved. Tap the save icon  to save changes .
Connect Device
The Connect Device screen allows you to connect your Windows device to the Geode.
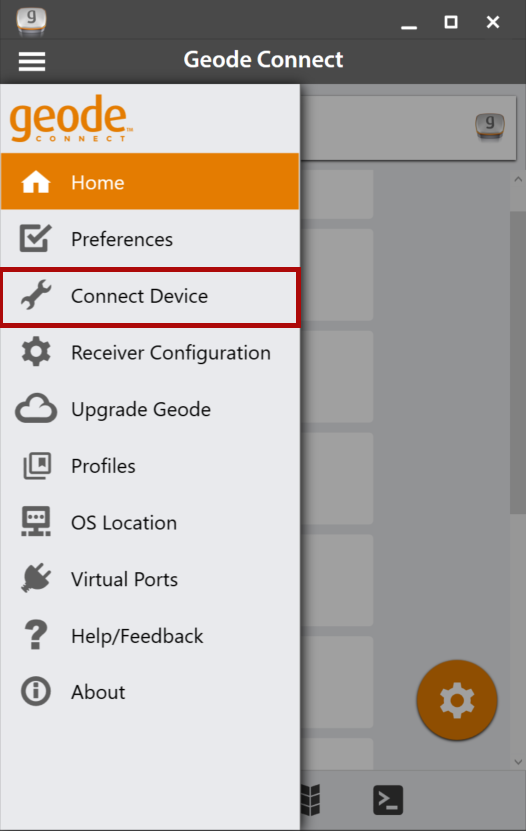
For more information, see Connect with the Geode.
Receiver Configuration
Note: The Receiver Configuration options are only available if you are actively connected to a Geode receiver. Changes saved on these screens are changes made to the Geode receiver, and these changes apply to all navigation and data collection apps using the Geode receiver.
From this screen, set up the Geode to meet the needs of your project or application.
You can also reach this screen by tapping the orange gear icon ![]() .
.
Below most settings, you can tap Description to view a detailed information about the setting(s).

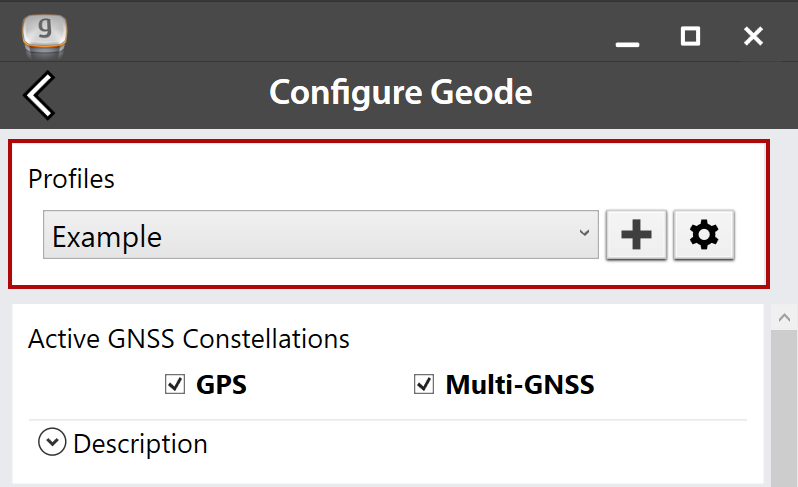
Profiles
A profile is an easy way to save and apply the configuration settings that fit a specific project or application. Open the Profiles screen to manage the configuration profiles for your GNS3 receiver.
Under Profiles, view the active profile. If no profile is selected, “Profile Not Selected” displays. To change the active profile, tap the drop-down arrow and select from the list of available profiles.
Add a Profile
To add a profile,
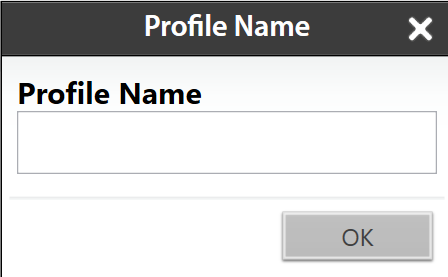
- Tap
 .
. - Enter the profile name and tap OK.
- Select the appropriate settings.
Expand an area to view additional settings for correction source, SBAS, subscriptions, and NTRIP configuration.
- Tap the save icon .
The new profile will be created based on the current receiver settings. Any changes you make to the receiver settings will be applied to the current profile.
Edit a Profile
To edit a profile,
- Under Profiles, ensure the profile you want to edit is displayed.
- Make the desired changes to the settings, and tap the save icon .
Manage Profiles
To manage the profiles, tap the gear icon ![]() to open the Profiles screen.
to open the Profiles screen.
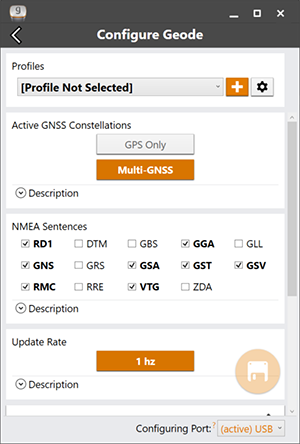
Active GNSS Constellations
You can choose which GNSS constellations to use in your solution: Multi-GNSS or GPS.
NMEA Sentences
You can choose which NMEA sentences you want the Geode to receive. In most instances, the default NMEA sentences are sufficient for your project or application.
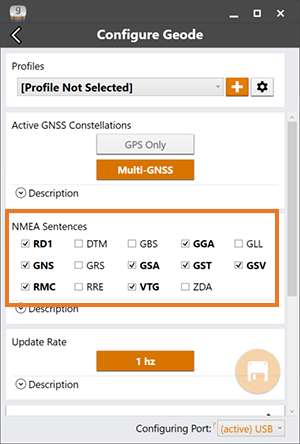
The following list explains the available NMEA sentences:
- RD1—Correction diagnostic message output
- DTM—Datum reference
- GBS—Satellite fault detection used for RAIM
- GGA—Detailed GPS position information
- GLL—Latitude and longitude data
- GNS—Fix data for a single or combined satellite navigation system
- GRS—GNSS range residuals
- GSA—GPS DOP and active satellite information
- GST—GNSS pseudorange error statistics
- GSV—GNSS satellites in view
- RMC—Recommended minimum specific GNSS data
- RRE—Range residual message.
- VTG—Course over ground and ground speed.
- ZDA—UTC time and date information
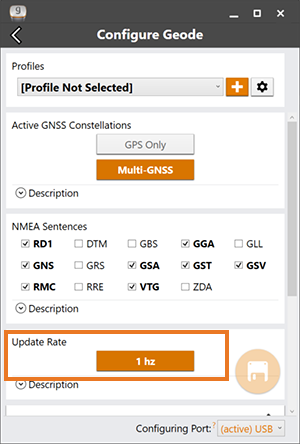
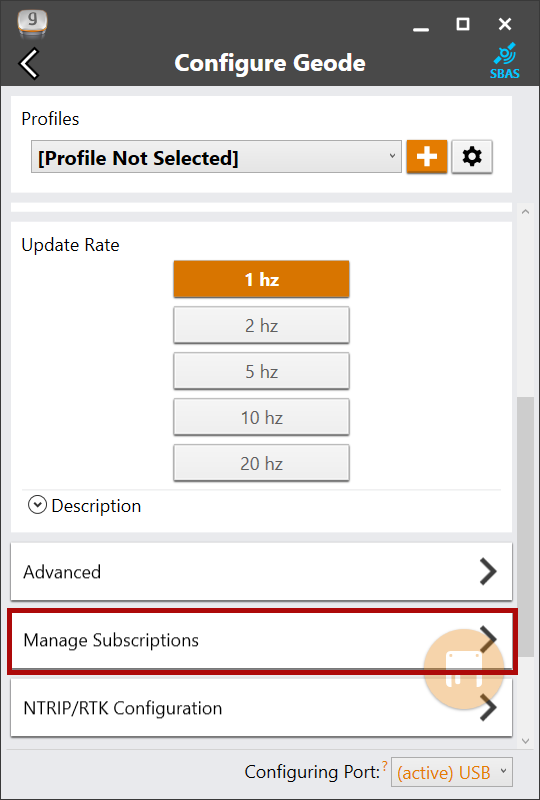
Update Rate
The update rate sets the message output rate through the active port. You can specify your preferences for the update rate. To upgrade the update rate, use the Upgrade Geode menu option.
Note: At higher data rates, we recommend turning off messages not required for your application, such as GNS, RRE, and VTG messages.
Note: Changes must be saved in order for them to remain from screen to screen. If the save icon in the lower right corner of the screen is orange, this means there has been a change that needs to be saved. Tap the save icon to save changes .
Advanced
The Advanced screen allows you to configure the following advanced settings for the Geode.
- NMEA Precision
- Mask Angle
- Correction Source
- SBAS
- Receiver Mode
- Battery Status Sentence
- Receiver Reset
Changes saved in the Advanced screens are made to the Geode receiver, not Geode Connect. Changes will appear in other navigational and data collection apps.

NMEA Precision
This specifies the number of decimal places to output in the GGA, GLL, and GNS messages.

Mask Angle
This specifies the elevation mask angle cutoff for the receiver. Any satellites below this angle will be ignored, even if they are available.
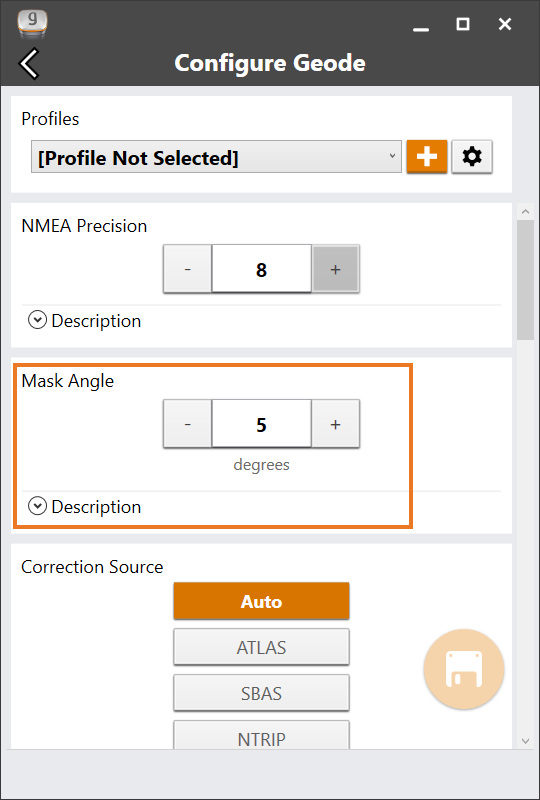
Correction Source
This specifies whether the Geode should automatically choose to apply the most accurate correction source available or use only a specific correction source. The Geode's default correction source is auto, which means automatically search and use the best available correction service. .
Note: If the most accurate correction source changes while data is being collected, there may be significant differences between positions corrected by different methods. Because different correction sources use different reference datum, an automatic change to a different correction source may look like an error in a data set.
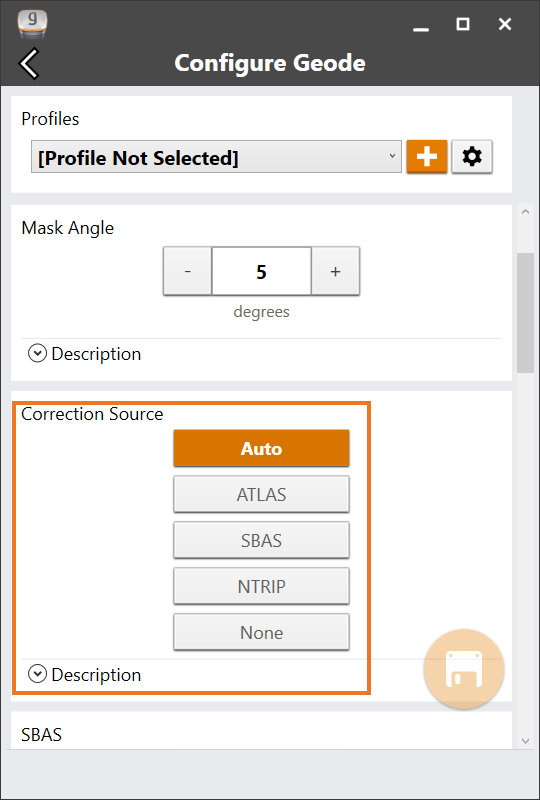
You may want to specify the correction source applied by the Geode. You can set the Geode to use any of the corrections sources listed in the table below.
|
Correction Source Options |
||
|---|---|---|
| Setting | Action | If signal is lost/unavailable |
|
Auto |
Geode chooses the correction source based on the current level of accuracy |
Geode will try the next option in the following order:
|
|
NTRIP/RTK |
Geode uses corrections only from NTRIP/RTK. | Geode will not apply any correction. |
|
Atlas |
Geode uses corrections only from Atlas. | Geode will not apply any correction. |
|
SBAS |
Use corrections only from SBAS. | Geode will not apply any correction. |
|
None |
Geode does not use any corrections. | Geode will not apply any correction. |
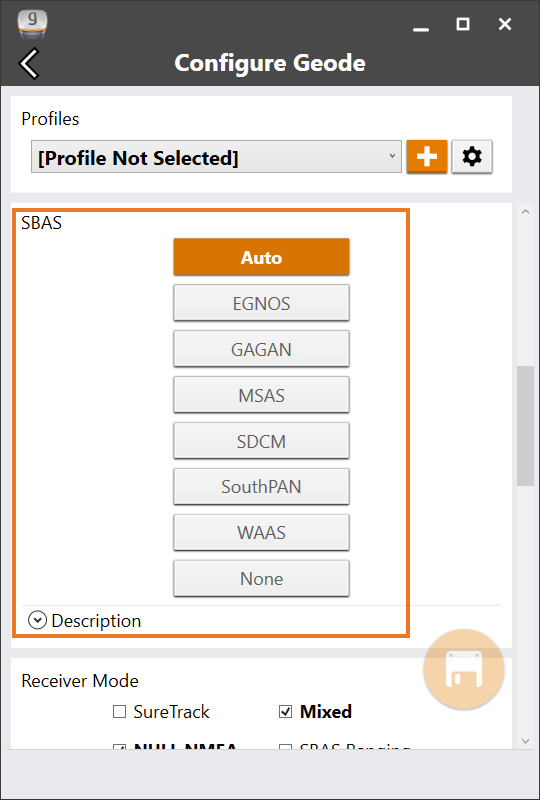
SBAS
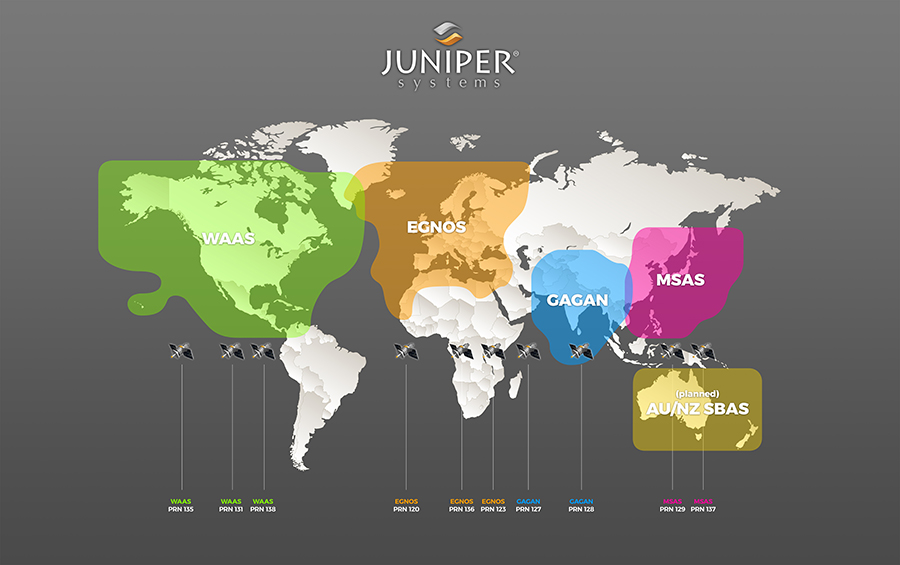
This specifies which SBAS satellites the Geode should use for GPS correction. Usually, selecting Auto is sufficient because the various SBAS services cover different geographical areas. However, there are some areas where these services overlap (see map below).
For example, if you are collecting corrected GPS positions in the Northeastern United States, the Geode may be receiving SBAS corrections from WAAS or EGNOS. If the receiver is set to Auto, it may even jump back and forth between the two.
The two services use different reference datum or models. Switching between them can cause significant error between different points of data.
In areas of overlap, the best practice is to select a specific SBAS service the Geode should accept corrections data from.
- Auto—Sets the appropriate SBAS PRNs based on the autonomous GPS position.
- EGNOS—European Geostationary Navigation Overlay Service (Europe SBAS) PRN 120, 124, 126
- GAGAN—GPS Aided GEO Augmented Navigation (India SBAS) PRN 127
- MSAS—MTSAT Satellite Augmentation System (Japan SBAS) PRN 129, 137
- SDCM—System for Differential Correction and Monitoring (Russia SBAS) PRN 125, 141, 140
- SouthPAN—Southern Positioning Augmentation Network (Australia and New Zealand SBAS) PRN 122
- WAAS—Wide Area Augmentation System (North America SBAS) PRN 133, 135, 138
- None—SBAS corrections disabled.
Receiver Mode
These options affect how the Geode collects and processes positioning information and how it outputs certain types of data.

|
Receiver Mode Options |
|||
|---|---|---|---|
| Option | Description | Recommendation | Additional Explanation |
| SureTrack | Legacy feature. Only seen with GNS 1 and 2 in an older version of Geode Connect. | ||
| Mixed | The default option. The receiver uses all GNSS satellite signals available to calculate the position solution. This includes non-GPS satellites, which do not have DGPS or SBAS corrections. Certain NTRIP/RTK services do provide corrections for non-GPS satellites. | The best choice for most situations. Particularly good if there is a lot of interference. | |
| NULL NMEA |
The recevier sends a NULL NMEA message when it cannot get a fix. |
Turn off if the app you are using shows your position as (0°, 0°), a location in the Atlantic Ocean west of Africa. | This option is available because different navigational apps interpret NULL messages differently. Some apps interpret a NULL message to mean that the Geode’s position is (0°, 0°), which is west of Africa in the Atlantic Ocean. |
| SBAS Ranging | The receiver treats SBAS satellites as GPS satellites to speed up the initial position fix. | Use to speed up the initial position fix. Turn off for improved accuracy. | SBAS satellites operate in a time system distinct from that of the GPS satellites, so a position solution that includes SBAS satellites may be less accurate than a GPS-only or GNSS-only solution. |
| Tunnel | Faster reacquisition of the fix after coming out of a tunnel. | Use it as needed. | |
Note: Changes must be saved in order for them to remain from screen to screen. If the save icon in the lower right corner of the screen is orange, this means there has been a change that needs to be saved. Tap the save icon to save changes .
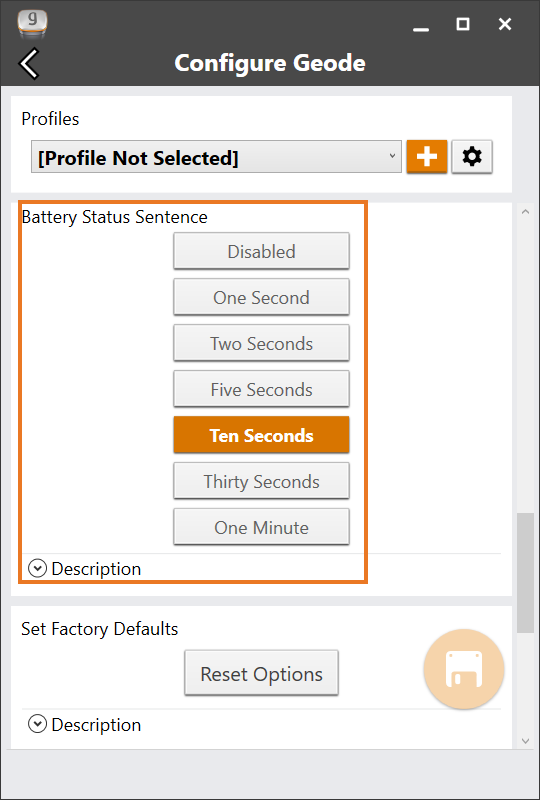
In Geode Connect, the battery status sentence looks like this:
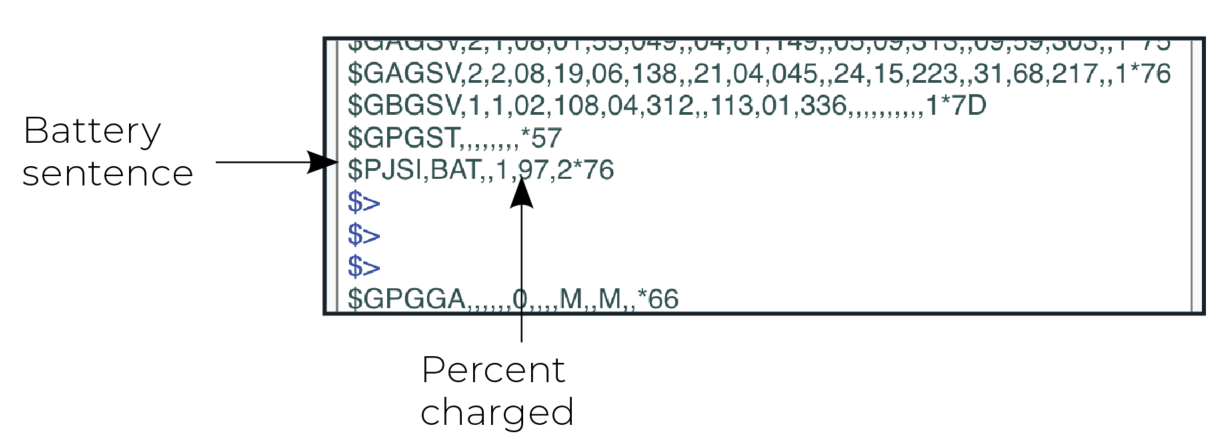
This sentence may not be recognized by some navigation or data-collection apps. If it causes problems in an app, disable it.
Receiver Reset
Reset Options allows you to reset your Geode with a soft reset or to the factory defaults.
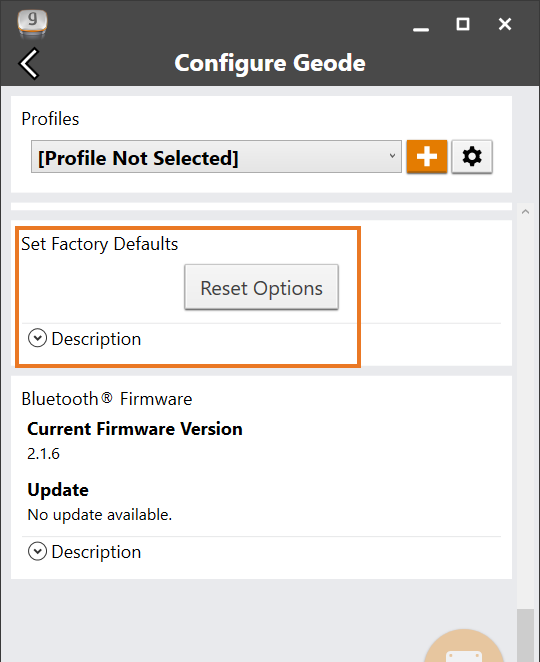
![]() CAUTION: Resetting the receiver cannot be undone.
CAUTION: Resetting the receiver cannot be undone.
The two choices for resetting your Geode are
- A soft reset returns the Geode to default settings.
- Set factory defaults returns the Geode to the default settings and also clears the real-time clock at startup, the backed up ephemeris and almanac, and reboots the receiver.
Following a factory reset, the time to first fix will increase by 4–6 minutes because the Geode will re-download the data when it connects with a positioning satellite.
The two almanac messages from the GPS satellites alternate every 12.5 minutes. After setting to factory defaults, the best practice is to turn on the Geode and wait 25 minutes to ensure a complete Almanac has been stored.
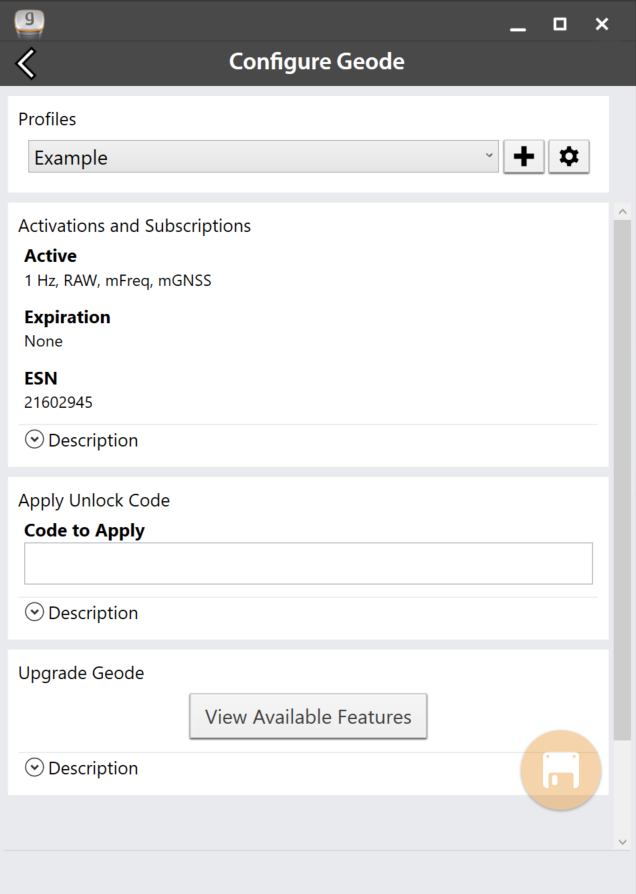
Manage Subscriptions
GNS3M devices offer a subscription to Atlas. This screen allows you to view the details of your current subscription, apply unlock codes, and view the subscriptions that are available for activation.
Tap View Available Features to apply upgrades to the Geode. For more information, see Upgrade_Geode.
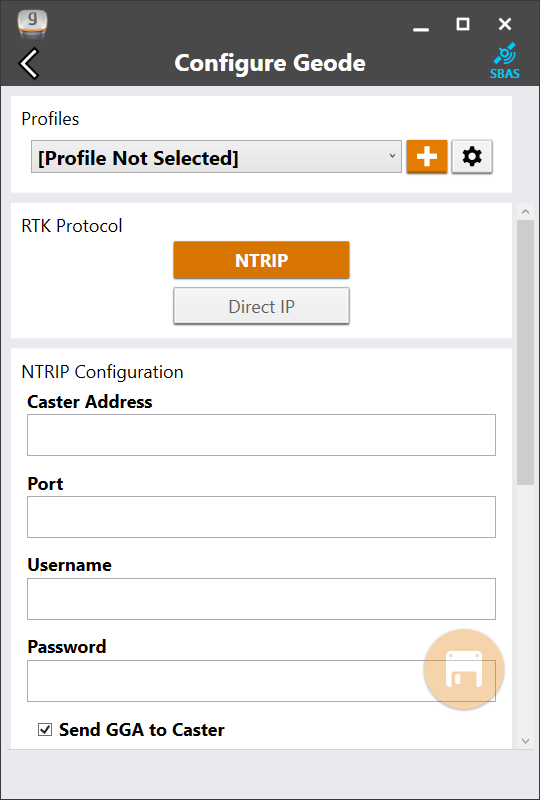
Configure NTRIP/RTK
Use this screen to enter the information supplied by your NTRIP/RTK service provider, including the caster IP address, port, username, and password.
Note: The picture below shows NTRIP selected as the RTK protocol. If the information from your service provider is only an IP address and port and does not include a username, password, and mount point, then choose Direct IP as your RTK protocol.
Note: NTRIP/RTK settings are stored in the Geode Connect app, not in the Geode receiver.
NTRIP is a useful protocol for precise correction of real-time positioning solutions. (See NTRIP and RTK.)
The Geode is able to calculate an RTK Fix/Float position with sub-meter to centimeter-level accuracy. NTRIP services do require an internet or cell data connection (via your mobile device) and usually involve either a free or paid subscription to the service.
If you have a subscription to an NTRIP/RTK service, Geode Connect will allow you to configure the Geode to use that service.
Note: Save changes before leaving the screen.
To establish an NTRIP/RTK connection,
- Ensure the handheld device you are using to host Geode Connect has a data connection.
- Enter the identifying information supplied by your NTRIP/RTK service provider.
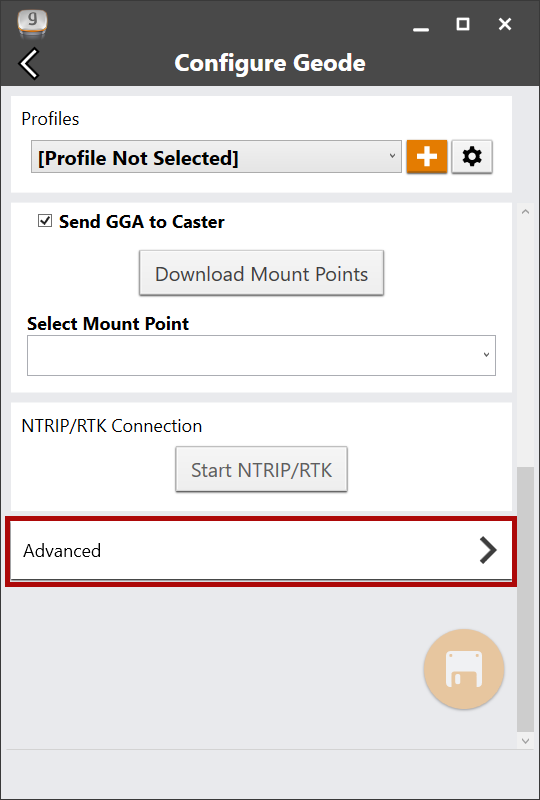
- Verify “Send GGA to Caster” is checked. This tells the Geode to send its position to the caster so that the caster can locate the mount points closest to the Geode’s position.
- Tap Download Mount Points.
- Tap the drop-down menu in the Mount Points section. This will open a list of mount points in the network close to the Geode’s position.
- Choose the appropriate mount point.
- Tap Start NTRIP/RTK.
When NTRIP/RTK is connected and working, the word NTRIP and a closed green plug will appear on the right side of the Home page. Tap this icon to return to the NTRIP/RTK configuration screen at any time.

If NTRIP appears on the home page with an open orange plug, the Geode is still trying to establish a connection to the NTRIP service. The connection might take a while. If the Geode has trouble connecting, try selecting a different mount point.

Tap on the icon to open the NTRIP screen. On this screen you can see the data that is received or stop the NTRIP connection.

Third-Party Apps and NTRIP/RTK
When using the Geode with your device, some third-party mapping and data-collection apps may need some help connecting to an NTRIP/RTK service.
If the third-party app has built-in NTRIP/RTK capabilities, do not use Geode Connect. Simply connect to the Geode and configure NTRIP/RTK in the third-party app.
If the third-party app does not have built-in NTRIP/RTK capabilities, you can use Geode Connect to supply that service directly to the app. You will need to connect the Geode to both apps: Geode Connect and the third-party app.
This is accomplished via Virtual COM Ports, which can be configured in Geode Connect.
Once the Geode is connected to both apps, configure NTRIP/RTK services in Geode Connect. Leave Geode Connect open while using the third-party app.
Configure NTRIP/RTK Advanced Options
The NTRIP/RTK Configurations Advanced screen allows you to give more direction about how Geode Connect will communicate with your RTK server.
Use TLS/SSL. From NTRIP/RTK Configurations Advanced screen you can indicate that you would like to use a TLS/SSL connection to your NTRIP service provider. Your NTRIP service provider will let you know if you need to use this option.
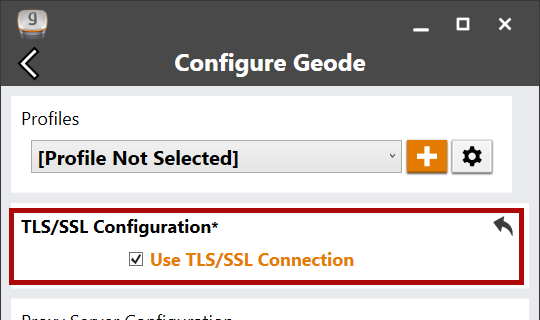
To connect with TLS/SSL,
- Select Use TLS/SSL Connection.
- Tap Save.
Use Proxy Server. From NTRIP/RTK Configurations Advanced screen you can direct Geode Connect to use a proxy server. You may need to use a proxy server if a network firewall blocks the port that your NTRIP service is using.
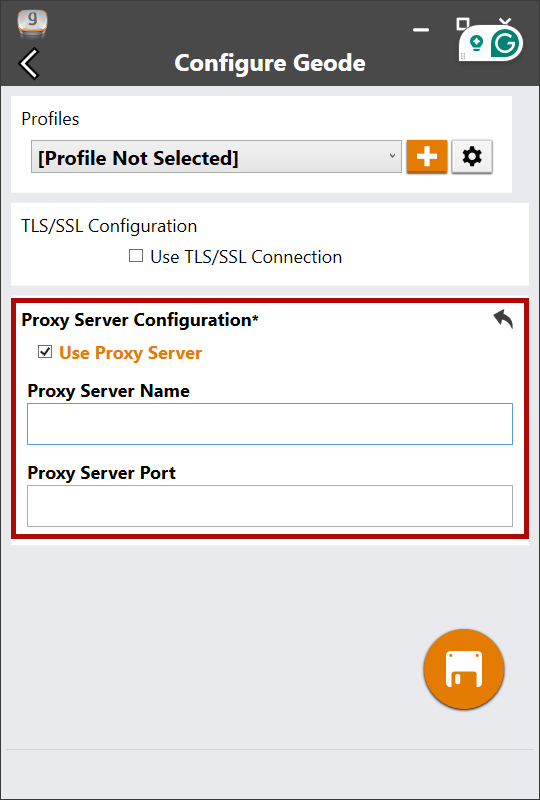
To use a proxy server,
- Select Use Proxy Server.
- Enter the proxy server information.
- Tap Save.
The Geode remembers the settings assigned to each configuration port, and the settings will be used when you physically connect with that port. This allows you to quickly switch between use cases.
Sample use cases for the same Geode:
- Use Case 1—Mounted on a pole for data collection on foot in heavy tree canopy. Geode settings optimized for a Bluetooth wireless connection, slow travel, and GNSS constellations (more potential satellites in view through the trees).
- Use Case 2—Mounted in the cab of a truck for carefully locating previously marked research sites. Geode settings optimized for a USB connection, slower travel, and NTRIP/RTK correction.
- Use Case 3—Mounted on a fast moving four wheeler on rolling hills with open sky.
Geode settings optimized for an RS-232C connection, quick travel, and an unobstructed open sky.
To define the settings for a configuration port,
- Select the port type in Configuring Port.
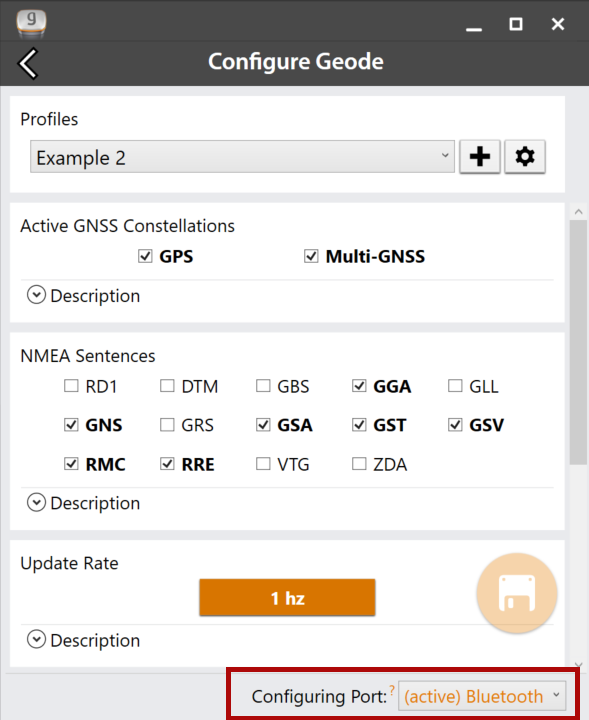
- Select the configuration settings and/or apply the appropriate profile.
- Tap the save icon . Geode Connect automatically applies these settings each time you connect with that configuration port.
Geode Connect automatically applies these settings each time you connect with that configuration port.
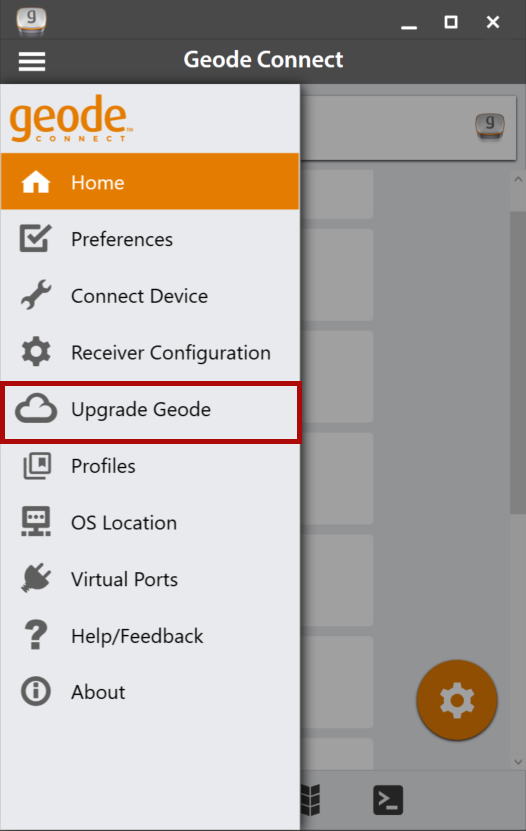
Upgrade Geode
You can apply upgrades via activations or subscriptions.
- Activations include a one-time upgrade to apply a new feature to the product. The available activations include increased output rates, multi-frequency, and Atlas basic L-band corrections.
- Subscriptions include time-based purchases of an H10 or H30 Atlas L-band correction service.
This screen can also be accessed from under Receiver Configurations > Manage Subscriptions.
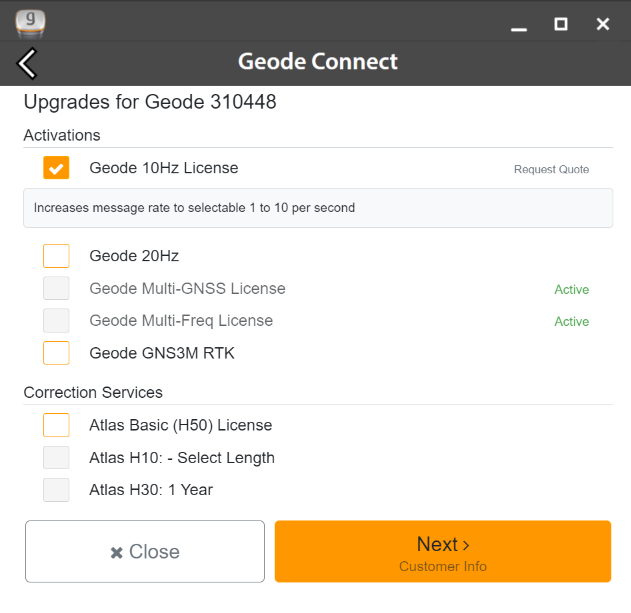
Request a Quote
To request an activation or subscription quote,
- Select the check box next to one or more activation or subscription.
- Select Next.
Note: If you have a single-frequency Geode, the only activations available are 10 Hz and 20 Hz.
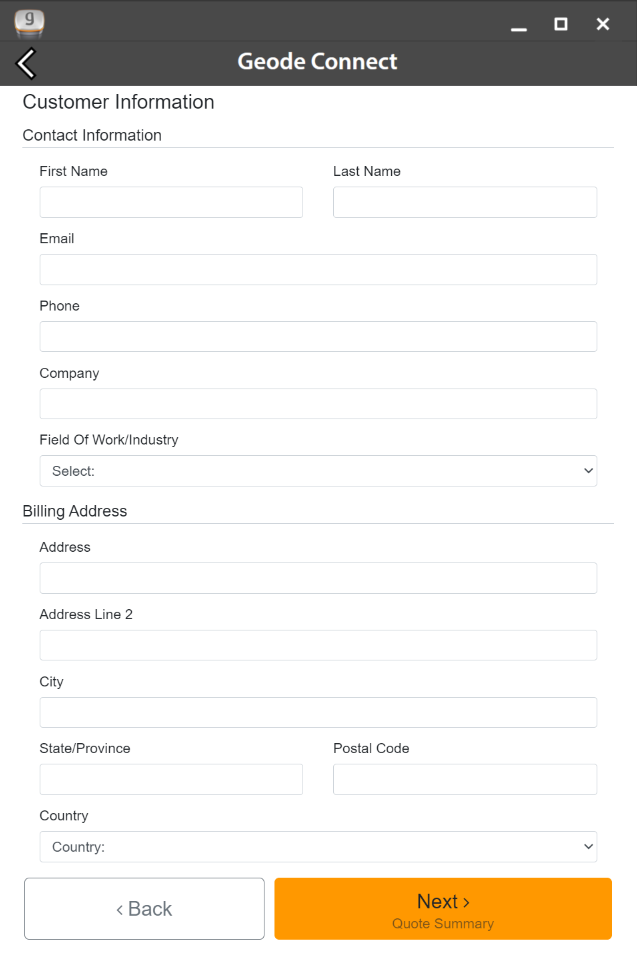
- Enter your contact information.
- Tap Next.
- On the Quote Summary screen, verify your information is correct and then select Send Now.
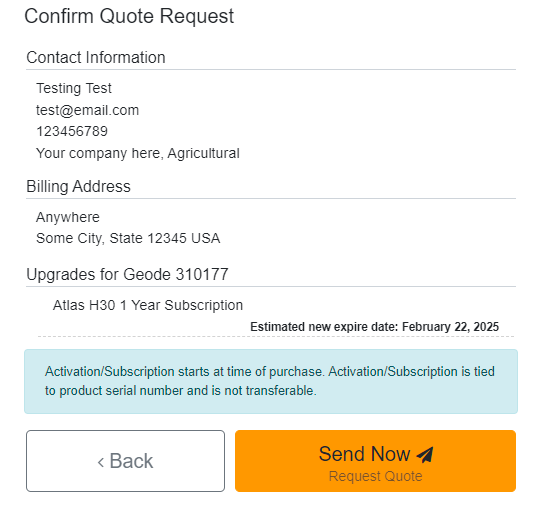
An email requesting your quote will be sent to Juniper Systems and a representative will contact you.
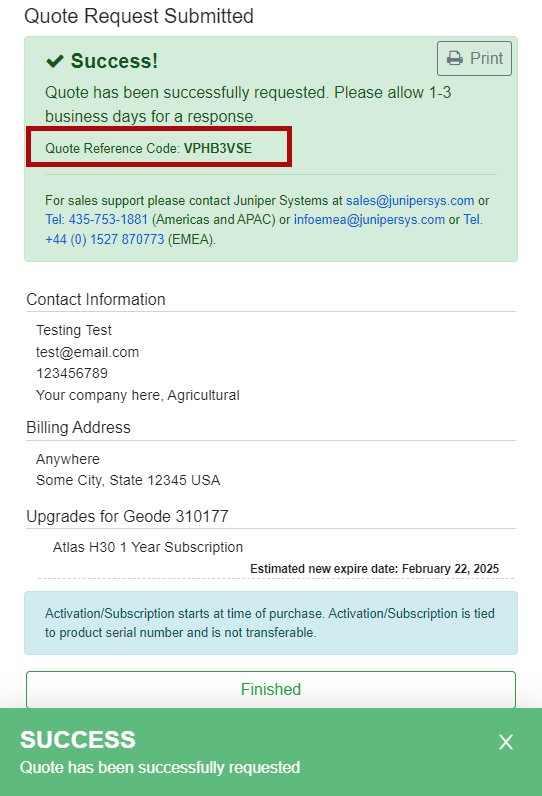
When the request email is sent, you will receive a Quote Reference Code. This code can be used to reference your request if you encounter any problems and need to contact Juniper Systems.
Activate Upgrade
If you have already purchased an activation or subscription you will need to activate it in Geode Connect.
- Verify your device is connected to the GNS3 and the internet.
- In the activations list, tap the yellow activate option next to the upgrade you would like to activate.

Extend a Subscription
To extend your current subscription,
- Select the check box next to your subscription. It will be marked with a yellow “Extend.”
- Select Next.
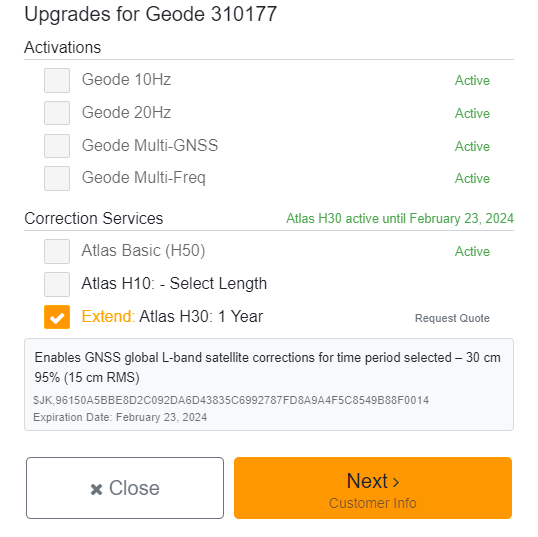
- Request a quote for the subscription by following the process listed in the Request a Quote section above.
If you purchased the subscription previously, you can activate the subscription for your GNS3 on this screen as well.
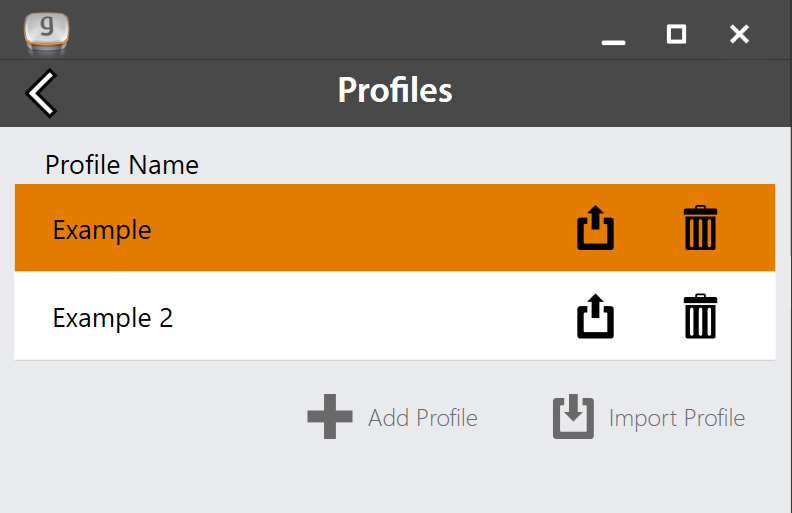
Profiles
A profile is an easy way to save and apply the configuration settings that fit a specific project or application. Open the Profiles screen to manage the configuration profiles for your GNS3 receiver.
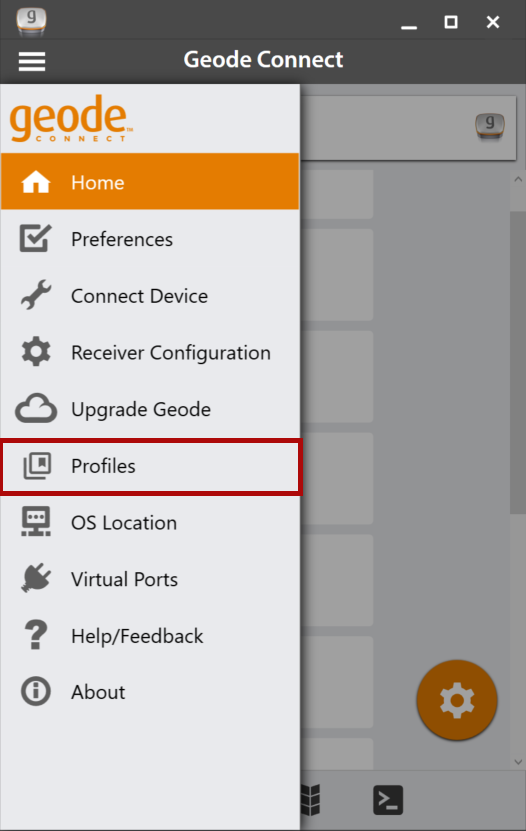
The active profile is shown in orange. Tap a profile to apply it.
Note: You can also change the active profile from the Receiver Configuration screen.
For instructions on adding or editing a profile, see Profiles in 9.5.3 Receiver Configuration.
Delete a Profile
To delete a profile,
- Tap the delete icon
 next to the profile you want to delete
 - Tap Delete to confirm the profile deletion.
Export a Profile
You can export a profile as a .JSON file and use it on other GNS3 receivers.
To export a profile,
- Tap the export profile icon
 next to the profile you want to export.
 - Select the desired file location.
Import a Profile
You can import a profile saved as a .JSON file.
To import a profile,
- Tap Import Profile
 .
. - Locate the profile you want to import.
The imported profile is automatically applied to the active connection port.
OS Location
Some apps depend on the Windows operating system to provide positioning data.
If you are using the Geode, it is because your project demands precision GNSS. However, if your app is depending on the operating system, it may be collecting data via the consumer-grade receiver in your PC or tablet—not the Geode.
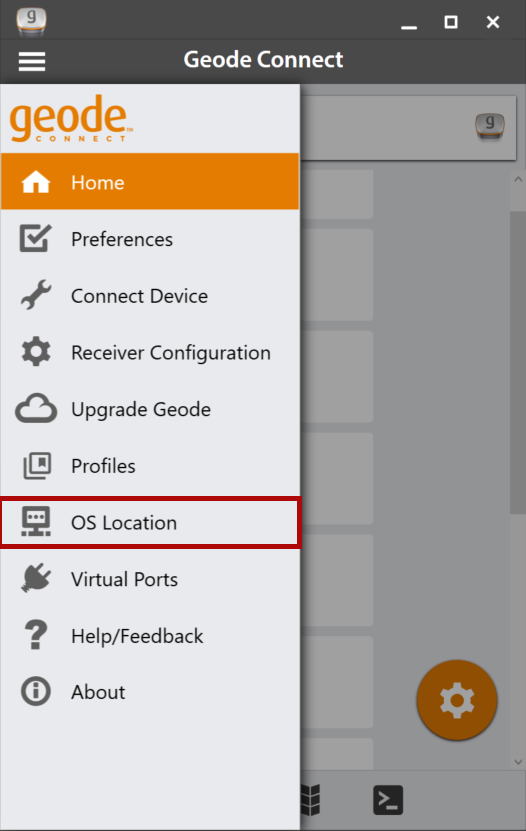
The best way to figure out where your app is getting its positioning data is to take a moment to examine the app. If the app allows you to directly choose an external receiver, you can select the Geode and trust that the app will rely on the Geode. If the app provides no option for choosing an external receiver, it is most likely relying on the Windows operating system for its data. You will need to enable Windows Location Reporting in Geode Connect.
Windows Location Reporting allows the Windows OS to use the Geode for its Location Services.
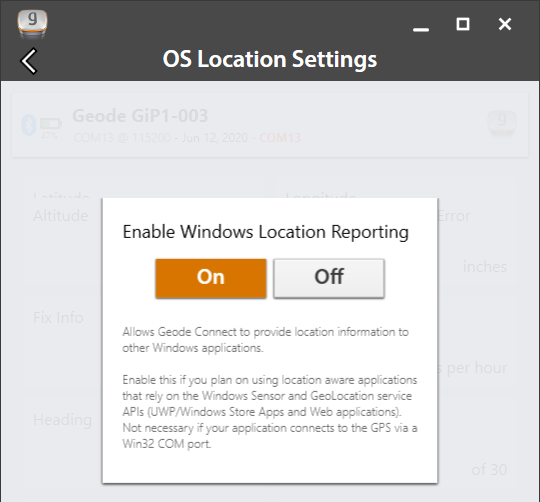
Select On to turn on Windows Location Services. Once the services are enabled, it is no longer necessary to keep Geode Connect open. If you choose to close Geode Connect, you will need to connect to the Geode via the third-party app or through Settings in Windows.
Note: The Geode sends data only from active NMEA sentences to Windows Location Services. To activate specific sentences, see NMEA Sentences.
Test Windows Location Reporting
After configuring the Geode to send location data through the Windows OS, you can test to make sure your third-party app is now getting its data from the Geode.
Both of the following tests require that the Geode is on and has had time to build its initial almanac, which usually takes about 25 minutes after it has been turned on for the first time outside.
One-Person Test
- Connect the Geode to your Windows PC or tablet via Bluetooth in the third-party app or the OS. (Geode Connect is not necessary once Windows Location Reporting is enabled.)
- Place the Geode in one stationary position. Do not move it.
- Open your third-party mapping or data-collection app.
- Holding your PC or tablet, walk five to ten paces out and then walk in a circle around the Geode.
If the position in the third-party app does not change significantly (remember, the Geode is just sitting there), the app is drawing its data from the Geode. You can continue to use the app and the Geode without any worries.
If the position moves in a circle, the app is drawing its data from your Windows PC or tablet. Make sure Windows Location Reporting has been configured.
Two-Person Test
One person holds the Geode, and the other person holds the Windows PC or tablet.
- Connect the Geode to your Windows PC or tablet via Bluetooth in the third-party app or the OS. (Geode Connect is not necessary once Windows Location Reporting is enabled.)
- Open your third-party mapping or data-collection app.
- The person holding the Windows PC or tablet remains stationary.
- The person holding the Geode walks five to ten paces out and then walks in a circle around the person holding the Windows device.
If the position moves in a circle, the app is drawing its data from the Geode. Windows Location Reporting is functioning as it should.
If the position does not change, the app is drawing its data from your Windows device’s internal GPS receiver. Make sure Windows Location Reporting has been configured.
Virtual Ports
Geode Connect for Windows PC has a Virtual COM Port Driver. You can use this driver to configure virtual COM ports as writeable. Once writeable, these ports can be used for two-way communication between the Geode and third-party apps, allowing the apps to both receive and send information to the Geode.
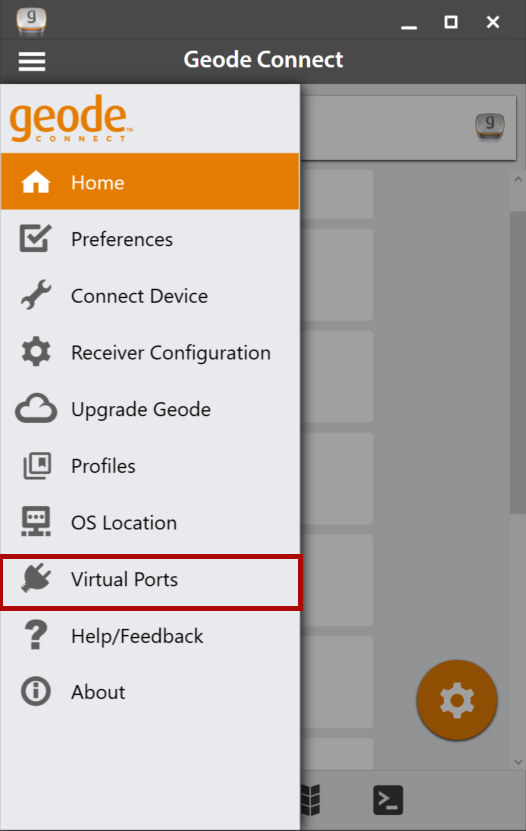
Virtual COM ports also provide a convenient way to connect the Geode to both apps (Geode Connect and the third-party app) simultaneously.
This configuration allows the Geode to use NTRIP/RTK data from Geode Connect to correct its position and then send that corrected position to the third-party app.
Note: The first time you select Virtual Ports, Geode Connect may prompt you to install the Virtual Port Driver. Go ahead and install it.
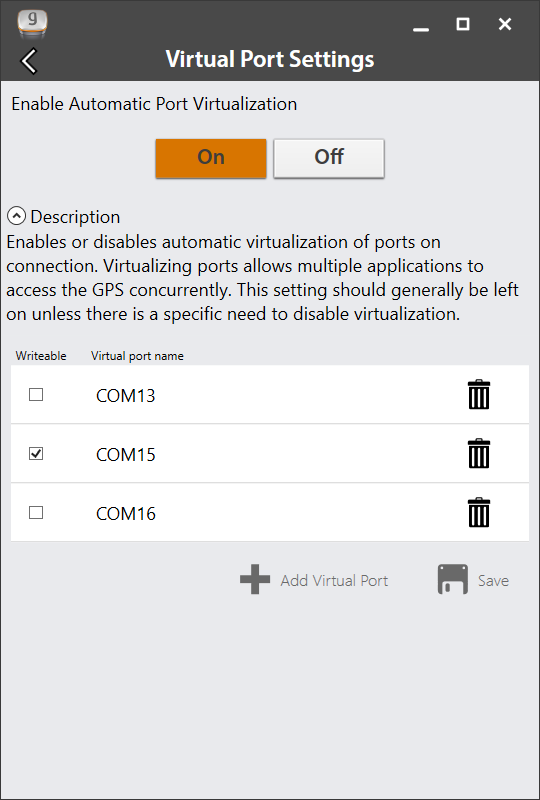
- Select On.
- Select the COM port you would like to make writeable (so that another app can use it to send commands to the Geode).
- Tap Save.
The selected port is now available for a third-party app to set up a two-way connection with the Geode.
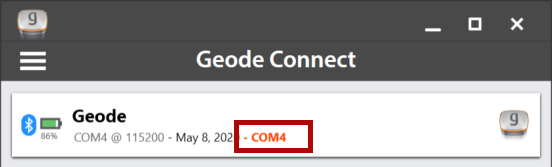
Note: This port should not be the same as the port being used by Geode Connect. In the example above, COM15 is made available for the third-party app. Geode Connect is using COM4.
The Virtual Port Settings page can also be used to delete or deactivate virtual COM ports. Be sure to tap Save after each change.
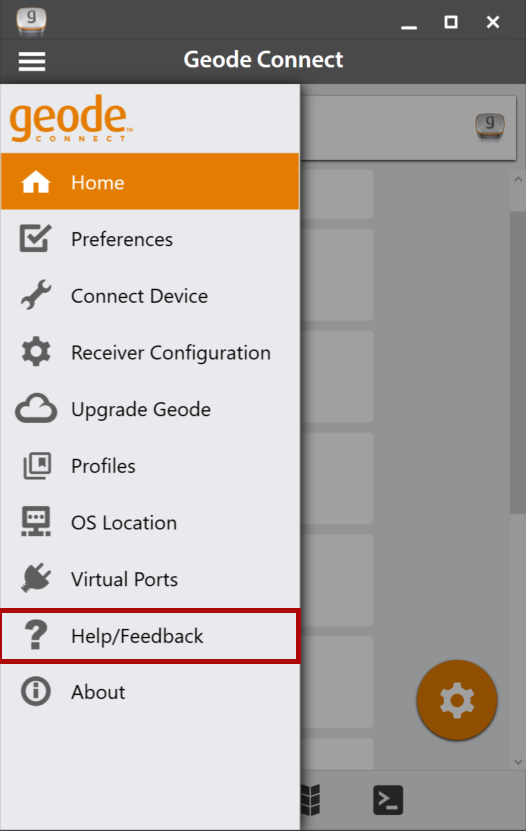
Request Help and Send Feedback
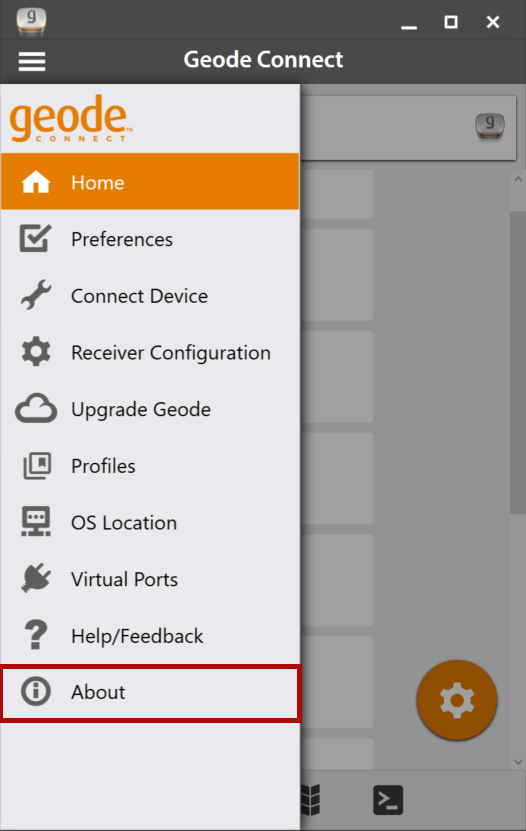
On the Settings screen, tap Help/Feedback.
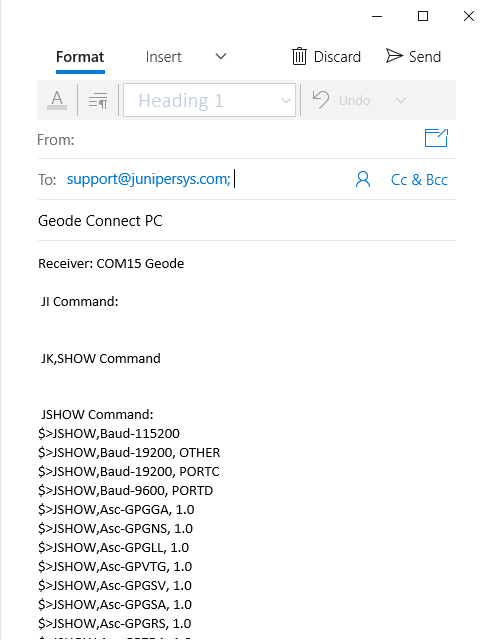
This feature links directly with the email account configured on your device and opens an email addressed to Juniper Systems Support. The email includes detailed configuration commands from the Geode. This allows Juniper Systems Support to diagnose and solve the problem more efficiently. This info is also used when purchasing a feature upgrade for the Geode.
You can enter additional information into the email to provide a further explanation about your issue.
About
The About screen shows the Geode Connect version currently in use.