HM-802 Printer Maintenance
13 Jan 2012
Below are listed procedures for performing several common maintenance tasks with the HM-802 Printer. Some procedures are applicable to previous HM-800 printers as well, but not all. For the full formatted document, please download and save the following file.
To Remove the Old Paper Roll:
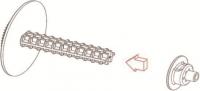
1. Remove paper from the reel:
- Gently grasp wound paper roll in one hand and spool flange in the other.
- Pull paper and cap off of the spool.
- Replace the cap by pressing cap until there is a positive snap onto the spool.
2. Tear the paper using the tear bar on the writing plate.
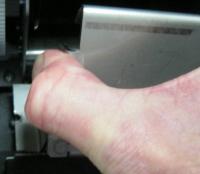
3. Remove the writing plate
- Grasp the writing plate with one hand (as shown at left).
- Squeeze the side of the writing plate that has only one mounting screw and gently lift on that side.
- Slide the other side out from under the two mounting screws (on the opposite side of the writing plate) and remove the writing plate.
4. Tear the paper between the supply spool and print head.
5. Pull the paper out of the print head.
CAUTION: Do not pull the paper out of the print head backwards as this may damage the print head mechanism.
6. Remove the paper roll and supply spool.
To Install a New Printer Ribbon Cartridge (ERC-09):
1. Tear the paper at the tear bar.
2. Pull about 6-12 inches of paper off the supply reel.
CAUTION: Do not pull the paper out of the print head backwards as this may damage the print head mechanism.
3. Notice the word PUSH on the right side of the ribbon cartridge. Push down to remove a used cartridge (see picture at left).
NOTE: If the ribbon cartridge has been replaced at least once before, the old cartridge may not have PUSH on the side. Remove it in the same manner.
4. Pull the old ribbon cartridge away from the printer.
5. Remove the new ribbon cartridge from its packaging.
6. Thread the paper through the cartridge between the plastic housing and the ribbon.
7. Situate the replacement printer ribbon cartridge in the same position as the old one and press down gently to seat. You should feel a slight click as the cartridge seats.
NOTE: If the printer ribbon is not fully seated, the print quality may be light or unreadable.
8. Replace the paper using steps 8-10 below.
To Install a New Paper Roll:

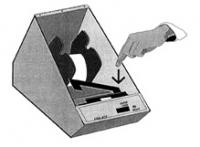
1. Insert new paper roll on the supply spool.
2. Cut the end of the paper so that it has a straight edge.
3. Insert new paper roll into the printer so that it would roll towards you if you pulled on the end of the paper (see picture above).
4. Push the straight edge of the paper into the print head slot with one hand while pressing the paper feed button with the other.
5. When the paper comes out of the top of the print head, pull it through another 6-12 inches.
6. Thread the paper through the tear bar of the writing plate.
7. Install the writing plate assembly in reverse order as you removed it.
8. Replace the cap on the reel and reinstall the take-up spool assembly with the gears on the left side.
9. Insert about two inches of paper through the slot in the take-up spool.
Once the printer begins to print, the paper will self-tighten around the spool.


